IP Configuration

This article describes how to configure the IP settings in Exigo.
Initially all devices must be configured with:
- Own IP address
- IP Address of Primary System Controller
- ID number (Directory Number)
- Default Gateway
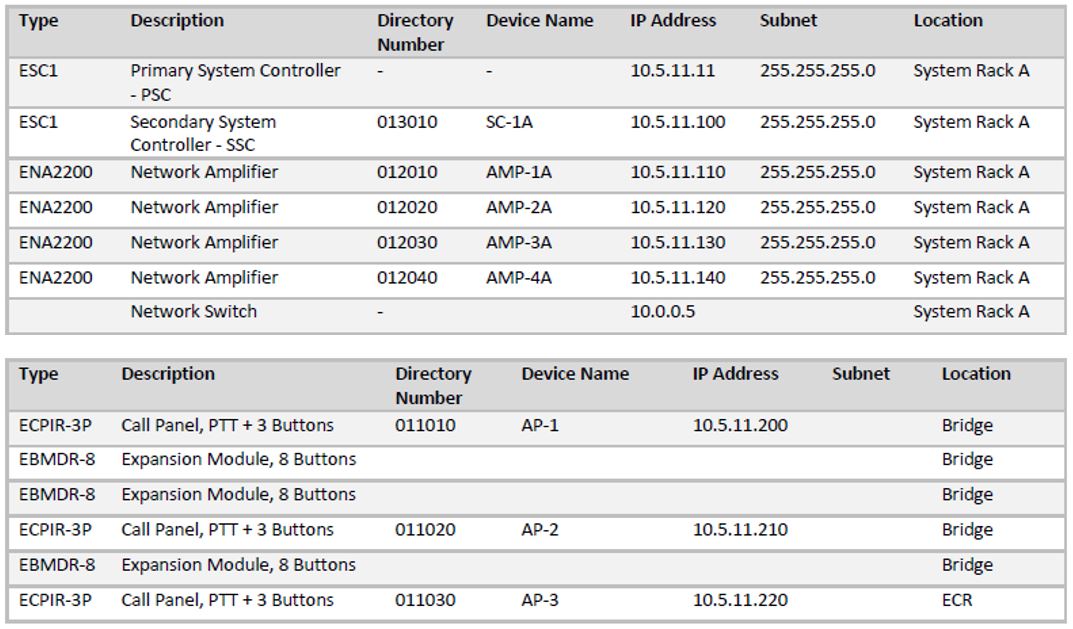
Creating a table with relevant information is considered good practice.
Contents
Primary System Controller
For the System Controller, the following two controller cards have to be configured:
- Primary System Controller / Domain Controller (AMC-IP card)
- Secondary System Controller (Turbine card)
Configuration is done via the system controller’s web interface.
After making sure that the system controller is connected to the same LAN and logical subnet as your PC, follow the procedure described below.
To set the IP address for the Primary System Controller:
- Open the front cover on the ESC1.
- Connect a PC to the service port (npe_eth0). This has 169.254.1.5 as the default IP address.
- Log on with a web browser (Username=admin / Password=alphaadmin)
- Navigate to System Configuration > Interfaces

- Set the desired IP Address of the Primary System Controller (npe_eth1)
Defining a Default Gateway
Only one Default Gateway can be defined.
To define a Default Gateway, select Add New, and enter:
- Destination net = 0.0.0.0/0
- Gateway on local subnet = IP Address of the default gateway
- Interface = On which Ethernet interface the default gateway is located
- Press Validiate
- Press Save & Apply

Secondary System Controller
When the system controller is connected to the network, the IP address is automatically obtained in one of two ways:
- An IP address is obtained from a DHCP server if there is one.
- If there is no DHCP server, an IP address in the range 169.254.x.x will be assigned.
- Turn the control knob on the system controller to select Settings > Network to see the IP address on the display.
To configure the IP setting for the Secondary System Controller:
- Connect a PC to either Eth1 or Eth2 ports on ESC1
- Log on to SSC with a web browser
- Navigate to Station Main > Main Settings

- Domain Controller IP: Set IP address of the Primary System Controller
- Directory Number: Set the Directory Number
- IP-address: Set the IP Address of the SSC
- Gateway: Set the default Gateway. A good practice is to set the default Gateway to: x.x.x.1.
Exigo Devices (Amplifiers, Panels and Kits)
Configuration is done via the amplifier’s web interface.
After making sure that the amplifier is connected to the same LAN and logical subnet as your PC, follow the procedure described below.
When the amplifier is connected to the network, the IP address is automatically obtained in one of two ways:
- An IP address is obtained from a DHCP server if there is one.
- If there is no DHCP server, an IP address in the range 169.254.x.x will be assigned.
To find out which IP address has be assigned:
- Amplifiers - Turn the control knob on the amplifier to select Settings > Network to see the IP address on the display.
- Access panel - Press any key on the access panel to make it speak its IP address.
- - for external access panels EAPII and EAFX, connect a headset
To configure the IP setting for Exigo devices:
- Log on to the device with a web browser
- Navigate to Station Main > Main Settings

- Domain Controller IP: Set IP address of the Primary System Controller
- Directory Number: Set the Directory Number
- IP-address: Set the IP Address of the device
- Gateway: Set the default Gateway. A good practice is to set the default Gateway to: x.x.x.1.