Local Mute Control
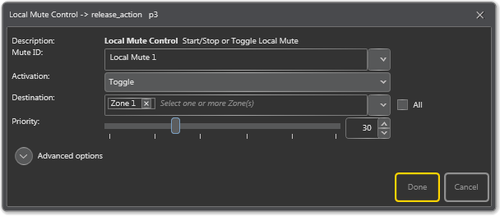
Local Mute Control will force any Control Output that is being used (and configured with Local Mute as Source) to trigger. As with other broadcasts, it will be added to the queue if other broadcasts with higher priority are active in the selected zone.
- Drag-and-drop Input Actions -> Local Mute Control to:
Amplifier -> Control Inputs -> CI -> CI_1-CI_6 -> on_action/off_action
or
Access Panels -> Programmable Keys -> Key -> p1-px -> press_action/release_action
Mute ID
The Local Mute to be triggered. This is the source in the control output that directs the actual physical function.
Activation
Start, Stop or Toggle the Local Mute.
Destination
The zones in which Local Mute will be started. The zone and source must correspond to the function configured in the output.
Priority
The priority of the broadcast. The muting will be active as long as the activity in the selected zone has a lower priority than the one set here. For example, the operator wants to mute GA with Priority 20, but he wants to hear the Abandon Alarm with Priority 15. In this case, Priority can be set to 18 here.
Contents
Organizing Local Mutes
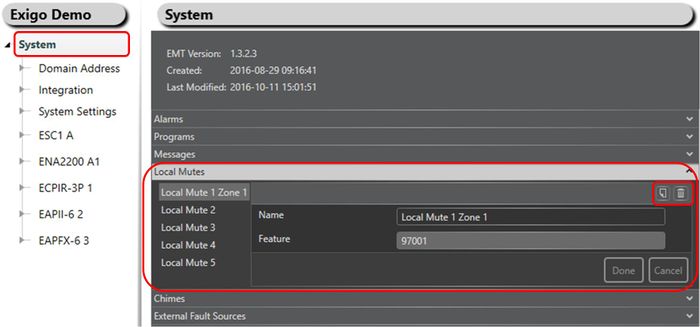
Local Mutes can be organized and renamed using Exigo Management Tool (EMT).
Renaming Local Mutes
For easy identification of an audio program they can be renamed to a more logical name.
Renaming Local Mute:
- In System > Local Mutes:
- Select the Local Mute you want to rename.
- Type in a new name in the Name field and press Done.
It is also possible to add or delete local mutes in the system.
- Press the Add or Delete button (top right in Local Mutes) to add or delete a local mute.
Advanced options
- Check the Use Default Parameters box to use default values for the parameters
- Enable Timeout – decides whether the function will timeout or not
- Timeout – the amount of time in seconds that the broadcast will be active. Typically, this is set to
- Deactivate Mute On – deactivate mute when the alarm state changes in the zone/broadcast:
- On Alarm start and stop - Deactivate mute on both start and stop
- On Alarm start - Deactivate mute on start of a new alarm that has lower priority than the one set here. Used when one wants the new alarm to be heard.
- On Alarm stop - Deactivate mute on stop. Used when the manual triggering of the mute should be turned off when the alarm stops.
Example of use
Case 1: Muting of alarms on bridge
A control output is used to mute a speaker on the bridge when the access panel is used. This will prevent feedback.
A button on the access panel is programmed with local mute control. This can then be used by the crew on the bridge to mute alarms triggered in the Exigo system by activating the local mute relay. With this functionality they will be able to work without hearing the alarm.
One important setting is the "Deactivate mute on". Here the setting could be "on alarm stop". This would then result in the mute going back to normal operation when all alarms are stopped in the system.
Case 2: Muting of alarms in control room
A control output is used to mute a speaker in the control room when the access panel is used. This will prevent feedback.
A button on the access panel is programmed with local mute control. This can then be used by the crew in the control room to mute alarms triggered in the Exigo system by activating the local mute relay. With this functionality they will be able to work without hearing the alarm. In this setting it might be important to hear if a new alarm is activated. Setting the "Deactivate mute on" to "on alarm start and stop" will ensure that the mute relay goes back to normal position (not being active) if a new alarm is activated.

