Difference between revisions of "Setting up redundant controller"
(Created page with "This article will explain how to setup and configure a Exigo system with redundant controller (ESC1). Category:Getting started") |
|||
| (16 intermediate revisions by the same user not shown) | |||
| Line 1: | Line 1: | ||
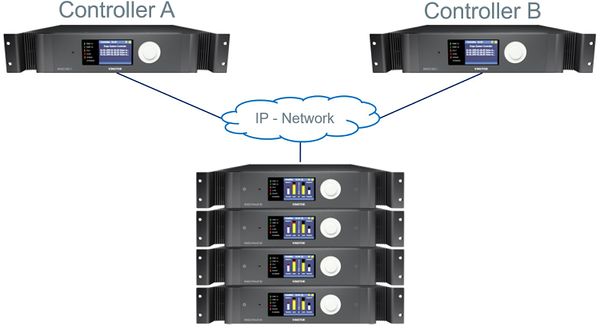
| − | This article will explain how to setup and configure a Exigo system with redundant controller ([[ESC1]]). | + | [[File:Redundancy funtions 2.JPG|thumb|right|600px|Redundant (hot standby) Controller]] |
| − | + | This article will explain the principle on how to setup and configure a Exigo system with redundant controller ([[ESC1]]).<br> | |
| − | |||
| − | |||
| − | |||
| − | |||
| − | |||
| + | Not all projects need a full A-B system. Sometimes the requirement is a singel system but with a redundant controller.<br> | ||
| + | This is done by configure a A-B system and adding amplifiers and access panels. | ||
| + | {{Note}} Before you start configure the Exigo system it is important that all devices have been updated to the latest software/firmware. <br> Use only software/firmware from the same Exigo package. | ||
| + | == Exigo Management Tool Setup == | ||
| + | * Start the Exigo Management Tool | ||
| + | * Click '''Projects''' at the lower-left of the window. | ||
| + | * Click '''New''' | ||
| + | * Click the '''New Database''' tab | ||
| + | * Click the right-arrow icon at the bottom of the window | ||
| + | [[File:Redundant controller 1.JPG|thumb|left|500px|New Project: A-B System]] | ||
| + | <br style="clear:both;" /> | ||
| + | * Enter a project name in the '''Project''' field | ||
| + | * Select the '''A-B System''' tab | ||
| + | * Click the right-arrow icon at the bottom of the window | ||
| + | [[File:EMT AB setup 4.png|thumb|left|500px|Database setup wizard - Zones and Domain IP address]] | ||
| + | <br style="clear:both;" /> | ||
| + | * Enter IP address for Controller A in '''Domain Address A''' | ||
| + | * Enter IP address for Controller B in '''Domain Address B''' | ||
| + | Follow the wizard at make the appropriate setting, then press '''Finish'''. | ||
| + | === Adding Amplifier(s) === | ||
| + | To add amplifier(s) to the system: | ||
| + | * Go to '''Components''' view | ||
| + | * Locate the '''Rack Mounted Devices''' | ||
| + | Here it is possible to drag the appropriate ENA amplifier(s) to the system: | ||
| + | [[File:Redundant controller 2.JPG|thumb|left|500px|Adding Amplifier(s)]] | ||
| + | <br style="clear:both;" /> | ||
| + | It is also possible to add multiple amplifiers to the system.<br> | ||
| + | Drag the amplifier to the top of the system tree. | ||
| + | [[File:Redundant controller 3.JPG|thumb|left|500px|Adding Amplifier(s)]] | ||
| + | <br style="clear:both;" /> | ||
| + | In the pop-up window select '''One device registered in controller A''' and press '''Done'''. | ||
| + | === Adding Access Panel(s) === | ||
| + | To add access panel(s) to the system: | ||
| + | * Go to '''Components''' view | ||
| + | * Locate the appropriate '''Access Panels''' section | ||
| + | Here it is possible to drag the appropriate access panel(s) to the system: | ||
| + | [[File:Redundant controller 2.JPG|thumb|left|500px|Adding Access Panel(s)]] | ||
| + | <br style="clear:both;" /> | ||
| + | It is also possible to add multiple access panels.<br> | ||
| + | In the pop-up window select '''One device registered in controller A''' and press '''Done'''. | ||
[[Category:Getting started]] | [[Category:Getting started]] | ||
Latest revision as of 09:24, 14 December 2017
This article will explain the principle on how to setup and configure a Exigo system with redundant controller (ESC1).
Not all projects need a full A-B system. Sometimes the requirement is a singel system but with a redundant controller.
This is done by configure a A-B system and adding amplifiers and access panels.
 Before you start configure the Exigo system it is important that all devices have been updated to the latest software/firmware.
          Use only software/firmware from the same Exigo package.
Exigo Management Tool Setup
- Start the Exigo Management Tool
- Click Projects at the lower-left of the window.
- Click New
- Click the New Database tab
- Click the right-arrow icon at the bottom of the window
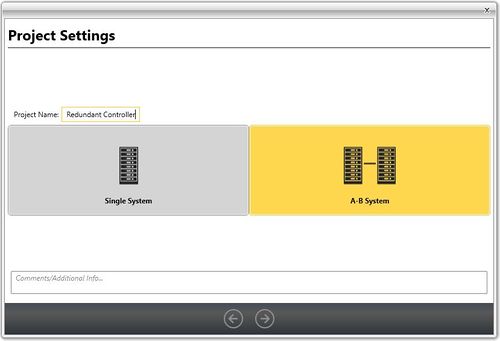
- Enter a project name in the Project field
- Select the A-B System tab
- Click the right-arrow icon at the bottom of the window
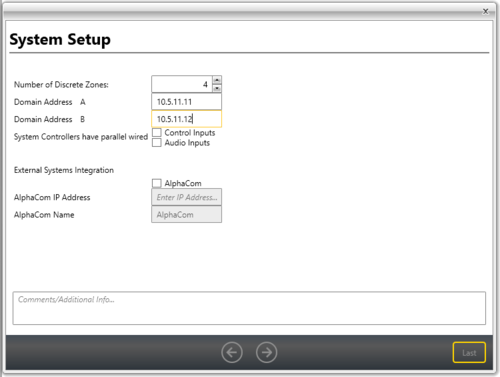
- Enter IP address for Controller A in Domain Address A
- Enter IP address for Controller B in Domain Address B
Follow the wizard at make the appropriate setting, then press Finish.
Adding Amplifier(s)
To add amplifier(s) to the system:
- Go to Components view
- Locate the Rack Mounted Devices
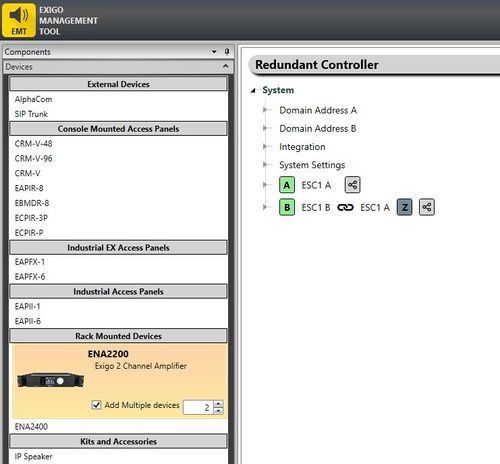
Here it is possible to drag the appropriate ENA amplifier(s) to the system:
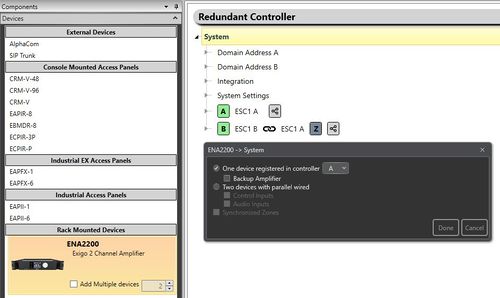
It is also possible to add multiple amplifiers to the system.
Drag the amplifier to the top of the system tree.
In the pop-up window select One device registered in controller A and press Done.
Adding Access Panel(s)
To add access panel(s) to the system:
- Go to Components view
- Locate the appropriate Access Panels section
Here it is possible to drag the appropriate access panel(s) to the system:
It is also possible to add multiple access panels.
In the pop-up window select One device registered in controller A and press Done.
