Audio Program Control
Audio Program Control controls the various programs you can use.
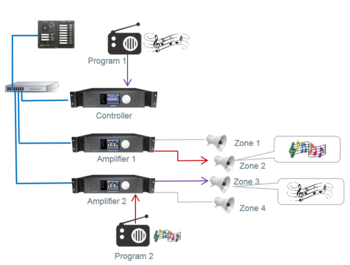
It will start/stop/toggle the selected audio program which can be used to source audio from a line/mic input into the system.
This is commonly used for background music programs.
Exigo supports 99 programs.
Contents
Connection of Audio Program Source
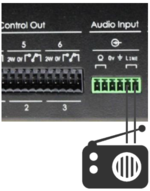
An analog audio source can be connected to Line-In of the following devices:
- ESC System Controller
- ENA Amplifier
- TFIE Kit
It is also possible to use the optional AGA Board.
Assigning an Audio Program Source to a Line Input
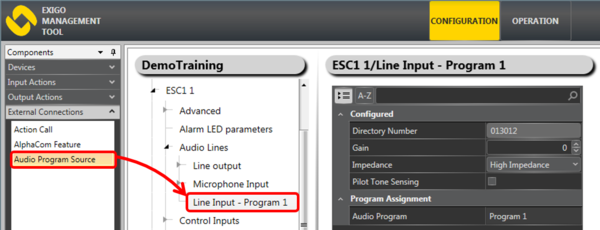
An Audio Line Input can be used for several purposes, and Audio Program is one of them. From the EMT tool, you must dedicate a Line Input for Audio Program distribution:
- In Components view, open External Connections
- In System, identify the Controller, the Amplifier or the TKIE kit to be used as Audio Program source, and expand to Audio Lines > Line Input
- Drag Audio Program Source to the Line Input
- A dialog box appears - select the Audio Program channel number. If there are several audio program sources, you would normally start with program 1 and so on.
Configuration
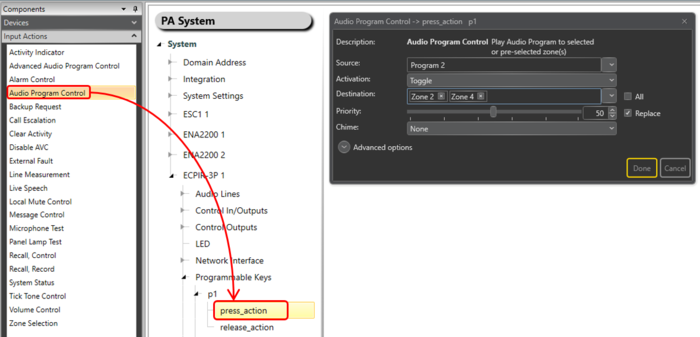
Controlling Background Music from an Access Panel
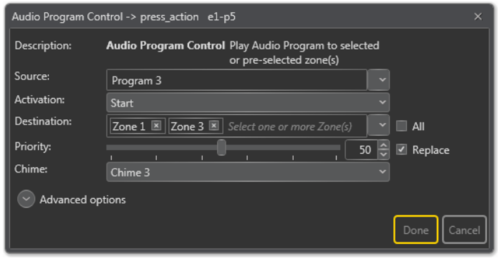
- Drag Audio Program Control to press_action on the desired key of the Access Panel
- Select the Source program and the Destination zones
- Choose Activation by Toggle or Start/Stop
Note: If Destination is left blank, one can use Zone Selection buttons to dynamically choose where to distribute the background music.
Controlling Background Music from a Control Input
Background music can be sent to predefined zones when a control input is activated. When deactivated, the music can be turned off.
To set Background music to ON:
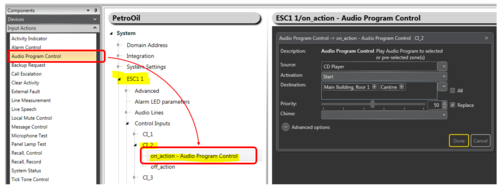
- Drag Audio Program Control to the on_action on the desired Control Inputs > CL_x
- Select the Source program and the Destination zones
- Choose Activation by Start
To set Background music to OFF:
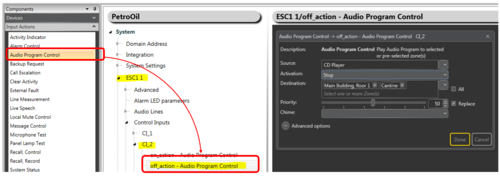
- Drag Audio Program Control to the off_action on the desired Control Inputs > CL_x
- Select the Source program and the Destination zones
- Choose Activation by Stop
Organizing Audio Programs
The Audio Programs can be organized and renamed using the Exigo Management Tool (EMT).
Renaming Audio Program
For easy identification of an audio program, they can be renamed to a more logical name.
To Rename Audio Program:
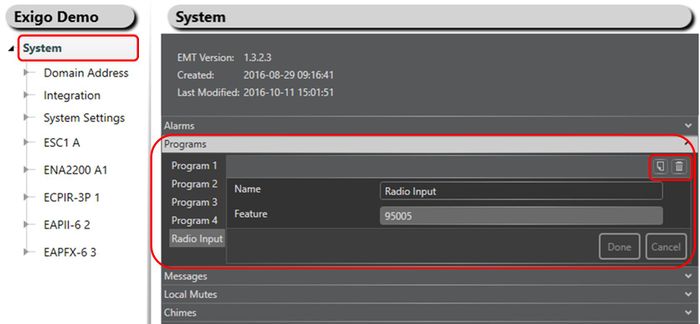
- Select System > Programs
- Select the Program you want to rename
- Type in a new name in the Name field and click Done
It is also possible to add or delete audio programs in the system.
- Click the Add or Delete icon (top right in Programs) to add or delete a program.
Parameter Details
Source
The Program that will be used.
Activation
Start, Stop or Toggle the broadcast.
Destination
The Zone(s) that will receive the background music broadcast. This may be left blank if access panel keys are used for dynamic zone selection.
Priority
The priority of the broadcast. Check the Replace box to make this broadcast replace other background music broadcasts with the same priority. If the box is not checked, broadcasts with the same priority will be shown as busy.
Chime
The Chime sound that will be played before the broadcast starts.
Advanced Options
- Check the Use Default Parameters box to use default values for the parameters
Is Alarm
When set the call is of type alarm. System will enter Alarm state, 'on_alarm' state of other calls will be activated.
Event "alarm tone" will be sent for start and stop of the message, allowing GPOs to use follow alarm during release delay operation.
Volume
- The Volume range is from -40 to +6 decibels.
Override pre-selected Zones by Zone Select
Check the Override pre-selected Zones by Zone Select box to use dynamic destinations.
- - This will also override the static destination list if defined.
Always Include
This is used together with dynamic zone selection to ensure that some critical zones are always part of the audio activity regardless of zone selection.
- Auto Select selected - the call will start regardless if a zone selection button is pressed or not.
- Auto Select not selected - if a zone selection button is not pressed, the call will not start.
On Busy
When one or more destination zones are busy with higher priority broadcasts, the following options are available:
- Reject - Reject the broadcast
- Go Partial - Run the broadcast now on free zones
- Queue - Put the broadcast in queue and run when all zones are free
If no value is chosen, a default value is used.
- For input actions Program Activation, Message, the default value is Go Partial.
- For input action Live Speech, the default value is Reject.
On Interrupt
When a broadcast is interrupted by a higher priority broadcast, the following options are available:
- Cancel - Cancel the broadcast
- Mute - Mute the broadcast in interrupted zones while a higher priority broadcast is running
- Mute All - Mute the broadcast in all zones when interrupted
- For input actions such as Program Activation, Message, Live Speech, the default value is Mute.
Release Delay
Time in seconds (0, 20 s) before the zones and resources are released after the broadcast has ended.
Timeout
- Enable Timeout - Selects if function will timeout or not
- Timeout - The event will be automatically cancelled after the selected time (0, 3600 s)
General Audio
- Indicates that the audio is not used for background music and it should therefore not be affected by Volume Control actions.
Audio Codec
Select between using system settings (Default) or G.722.
Escalation ID
ID used if the escalation function will be used to change parameters of this call. It is possible to add multiple ID's.
