Difference between revisions of "IP Configuration"
Jump to navigation
Jump to search
(→Primary System Controller) |
(→Secondary System Controller) |
||
| Line 26: | Line 26: | ||
* Log on to SSC with a Web Browser. | * Log on to SSC with a Web Browser. | ||
* Navigate to '''Station Main''' -> '''Main Settings''': | * Navigate to '''Station Main''' -> '''Main Settings''': | ||
| + | [[File:Secondary Controller Settings 1.png|thumb|left|600px|Web interface for the Secondary System Controller]] | ||
| + | <br style="clear:both;" /> | ||
* Set IP address of the Domain Controller. | * Set IP address of the Domain Controller. | ||
* Set the Directory Number. | * Set the Directory Number. | ||
Revision as of 10:51, 23 November 2016
This article describes how to configure the IP settings in Exigo.
Initially all devices must be configured with:
- Own IP address
- IP Address of Domain Controller
- ID number (Directory Number)
- Default Gateway
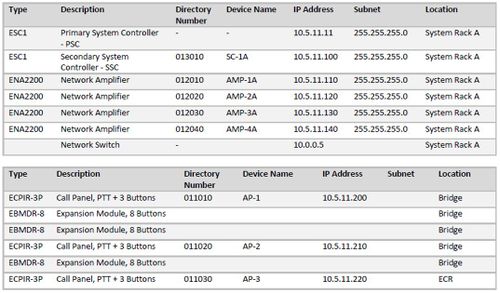
Creating a table with relevant information is considered good practice.
Primary System Controller
To set the IP address for the Primary System Controller:
- Open the front cover on the ESC1.
- Connect a PC to the service port (npe_eth0). This has 169.254.1.5 as default IP.
- Log on with a Web Browser (admin/alphaadmin).
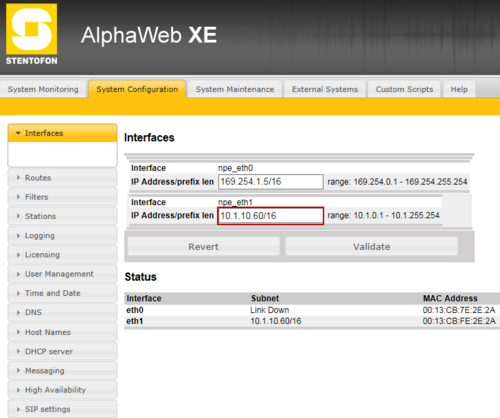
- Navigate to System Configuration -> Interfaces:
- Set the desired IP Address of the Primary Controller (npe_eth1).
Secondary System Controller
To configure the IP setting for the Secondary System Controller:
- Connect a PC to either Eth1 or Eth2 on ESC1.
- Log on to SSC with a Web Browser.
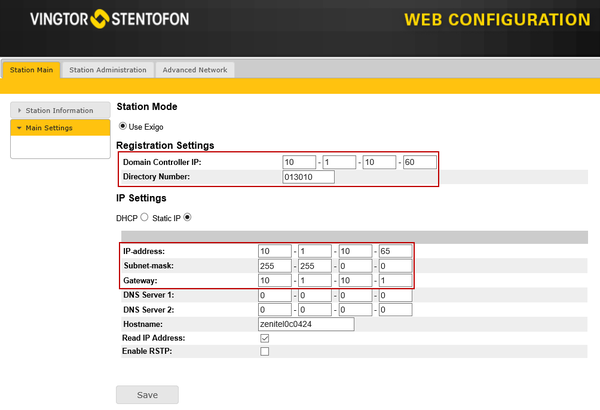
- Navigate to Station Main -> Main Settings:
- Set IP address of the Domain Controller.
- Set the Directory Number.
- Set the IP Address of the SSC.
- Set the default Gateway.


