Difference between revisions of "EMT Getting Started"
Jump to navigation
Jump to search
(→Step 2. Add Amplifiers) |
|||
| Line 23: | Line 23: | ||
== Step 2. Add Amplifiers == | == Step 2. Add Amplifiers == | ||
In '''Components''' view open '''Devices''' view.<br> | In '''Components''' view open '''Devices''' view.<br> | ||
| − | [[File:EMT getting started 3.JPG|thumb|left| | + | [[File:EMT getting started 3.JPG|thumb|left|300px|EMT - Adding Amplifier]] |
<br style="clear:both;" /> | <br style="clear:both;" /> | ||
Drag the Amplifier into '''System'''. | Drag the Amplifier into '''System'''. | ||
| − | |||
== Step 3. Defining zones == | == Step 3. Defining zones == | ||
Revision as of 14:33, 16 November 2016
This article describes how to create and upload new database.
The steps needed to create and upload a database is:
- Create a new database
- Add Amplifiers
- Defining zones
- Add Access Panels
- Upload database
Contents
Step 1. Create a new database
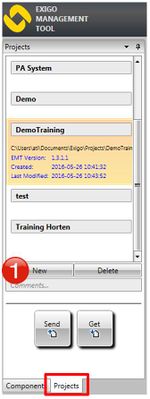
In the navigation pane, select Projects view.
Press New and follow the wizard.
All of the parameters in the wizard may be changed at a later stage.
Step 2. Add Amplifiers
In Components view open Devices view.
File:EMT getting started 3.JPG
EMT - Adding Amplifier
Drag the Amplifier into System.


