Difference between revisions of "Turbine Image Recovery"
(→Using Static IP) |
|||
| Line 70: | Line 70: | ||
eth0.serverip=10.1.11.2 | eth0.serverip=10.1.11.2 | ||
| + | The IP setting must be done after each reset of the unit. | ||
| + | |||
| + | You should now be ready upgrade the unit. | ||
| − | |||
Revision as of 08:57, 19 August 2016
This article describes how to upload firmware to a Turbine device if the firmware is corrupted and the unit is bricked.
It is important that this must be used as a last resort and the only way to reach the unit is using serial port.
This applies to the following devices:
- ESC1 Controller - only the Secondary System Controller.
- ENA Amplifiers
- ECPIR-P/ECPIR-3P/EAPIR-8 Access Panels.
- EAPII-1/EAPII-6 Access Panels.
- TKIS-2/TKIE-1 kits.
Contents
Prerequisite
The upgrade process is done by using the following tools:
- Standard TFTP server.
- Serial console to run the process.
In order to upload the firmware you need the following:
- USB to Serial Cable. A tutorial on how to make the cable can be found here.
This cable must be used for the access panels and the kits.
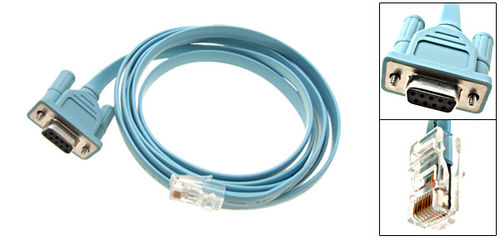
- For the ESC Controller and ENA Amplifiers you need to use a serial cable like this:
- TFTP server with the image package. TFTP server
- SSH client. PuTTY:
Connection
A tutorial on how to connect PC to the access panels and kits can be found here.
You need to find the COM port for the USB cable. This can be found in the Device manager on your PC:
To connect to ESC Controller and ENA Amplifiers you must use the cable that is described above in Prerequisite.
Procedure
Prepare the TFTP server on the PC
The TFTP server must be prepared with a Prod image package (f.ex. exi-prod-4.3.1.10). It is important that the image is a Prod image. It is not possible to use the standard exi packages.
On a standard TFTP server extract and store the archive to the TFTP root folder.
SSH connection Step-By-Step
- Connect the modified USB cable to the access panel or kit. On the ESC or the ENA you must use the described Serial cable.
- Connect a Ethernet cable for the new Image transfer.
- Start "PuTTY" (or another terminal emulator), and select:
- Connection type = Serial
- Serial line: Set COM port number according to the device installation
- Speed = 115200.
- Select Open to start communication. Leave the window open.
- 4. During initial boot of the device hit CTRL-C to stop the booting process.
Prepare the network on the device
There is two way of setting the network for the upgrade procedure:
Using a DHCP server
- If you are using a DHCP server you should these commands:
dhcp
eth0.serverip={serverip}
Using Static IP
- If you are using Static IP you should these commands:
st_net_enable
eth0.ipaddr=10.1.11.6
eth0.gateway=10.1.11.1
eth0.netmask=255.255.255.0
eth0.serverip=10.1.11.2
The IP setting must be done after each reset of the unit.
You should now be ready upgrade the unit.


