Difference between revisions of "Setting up AlphaCom integration"
(→Step 2. Action Calls) |
|||
| (50 intermediate revisions by 2 users not shown) | |||
| Line 5: | Line 5: | ||
Exigo and AlphaCom is integrated with each other using SIP.<br> | Exigo and AlphaCom is integrated with each other using SIP.<br> | ||
The basic use cases for this integration is to do public announcement form the intercom and include intercoms in alarm distribution from Exigo. | The basic use cases for this integration is to do public announcement form the intercom and include intercoms in alarm distribution from Exigo. | ||
| + | |||
| + | {{Note}} Before you start configure it is important that all Exigo devices have been updated to the latest software/firmware. <br> Use only software/firmware from the same Exigo package. | ||
| + | |||
| + | For updates to the AlphaCom [https://wiki.zenitel.com/wiki/Downloads| see this page.] | ||
== Configuration Overview == | == Configuration Overview == | ||
| − | Exigo Management Tool (EMT) is used for setting up the integration | + | Exigo Management Tool (EMT) is used for setting up the integration in Exigo. |
[[File:Alphacom integration 2.JPG|thumb|left|500px|EMT]] | [[File:Alphacom integration 2.JPG|thumb|left|500px|EMT]] | ||
<br style="clear:both;" /> | <br style="clear:both;" /> | ||
| − | AlphaPro is used for setting up the integration | + | AlphaPro is used for setting up the integration in AlphaCom. |
[[File:Alphacom integration 3.JPG|thumb|left|500px|AlphaPro]] | [[File:Alphacom integration 3.JPG|thumb|left|500px|AlphaPro]] | ||
<br style="clear:both;" /> | <br style="clear:both;" /> | ||
| Line 28: | Line 32: | ||
== AlphaPro Configuration == | == AlphaPro Configuration == | ||
Basic configuration on the AlphaCom contains two steps: | Basic configuration on the AlphaCom contains two steps: | ||
| − | * Define and map IP addresses to the Exigo Node. | + | * Define and map IP addresses to the Exigo Node (the Exigo controller). |
* Define and set up the group which Exigo should call. | * Define and set up the group which Exigo should call. | ||
| Line 40: | Line 44: | ||
<br style="clear:both;" /> | <br style="clear:both;" /> | ||
| − | === Step 2. | + | Set up Net Routing:<br> |
| − | The next step is to add the directory numbers which are used in Exigo. These numbers are from '''98001''' to '''98099''' | + | Go to '''Exchange & System''' > '''Net Routing''': |
| + | [[File:Alphacom integration net routing 1.JPG|thumb|left|600px|AlphaPro - Setup the Net Routing]] | ||
| + | <br style="clear:both;" /> | ||
| + | Select '''Insert''':<br> | ||
| + | Select the Exigo node:<br> | ||
| + | [[File:Alphacom integration net routing 2.JPG|thumb|left|400px|AlphaPro - Setup the Net Routing]] | ||
| + | <br style="clear:both;" /> | ||
| + | Select ACDP Link: SIP Link (31) <br> | ||
| + | Also tick of Exigo Node <br> | ||
| + | [[File:Alphacom integration net routing 3.PNG|thumb|left|500px|AlphaPro - Setup the Net Routing]] | ||
| + | <br style="clear:both;" /> | ||
| + | Press '''OK'''. | ||
| + | |||
| + | === Step 2. Defining Directory Numbers === | ||
| + | The next step is to add the directory numbers which are used in Exigo. These numbers are from '''98001''' to '''98099'''.<br> | ||
Select Directory and Features: | Select Directory and Features: | ||
[[File:Alphacom integration 7.JPG|thumb|left|500px|AlphaPro - Directory and Features]] | [[File:Alphacom integration 7.JPG|thumb|left|500px|AlphaPro - Directory and Features]] | ||
<br style="clear:both;" /> | <br style="clear:both;" /> | ||
| − | Here you need to add the number of directory numbers/'''Action Calls''' you need. | + | Here you need to add the number of directory numbers/'''Action Calls''' you need.<br> |
| − | Add a directory number '''98001''' with feature number 9 (Call a User).<br> | + | Add a directory number '''98001''' with '''feature number 9 (Call a User)'''.<br> |
| − | This will give you a number that are automatically in All Call 84, and can also be added to groups. | + | [[File:Alphacom integration 8.JPG|thumb|left|500px|AlphaPro - Directory and Features]] |
| + | <br style="clear:both;" /> | ||
| + | This will give you a number that are automatically in All Call 84, and can also be added to groups.<br> | ||
Give the '''Directory Number''' a descriptive text in '''Display Text'''.<br> | Give the '''Directory Number''' a descriptive text in '''Display Text'''.<br> | ||
The '''User''' will look like this: | The '''User''' will look like this: | ||
| − | [[File:Alphacom integration | + | [[File:Alphacom integration 9.JPG|thumb|left|500px|AlphaPro - User]] |
<br style="clear:both;" /> | <br style="clear:both;" /> | ||
Check the '''SIP Station''' box.<br> | Check the '''SIP Station''' box.<br> | ||
| Line 56: | Line 76: | ||
== EMT Configuration == | == EMT Configuration == | ||
| − | There is 3 main configurations that needs to be done in EMT | + | There is 3 main configurations that needs to be done in EMT: |
| + | * The AlphaCom node needs to be added. | ||
| + | * '''Actions Calls''' and | ||
| + | * '''AlphaCom features''' also needs to be configured. | ||
=== Step 1. Add the AlphaCom node === | === Step 1. Add the AlphaCom node === | ||
First step is to add the AlphaCom node to the system.<br> | First step is to add the AlphaCom node to the system.<br> | ||
In Components view expand the '''External Devices'''.<br> | In Components view expand the '''External Devices'''.<br> | ||
| − | Drag the AlphaCom to the '''System''' | + | Drag the AlphaCom to the '''System''' > '''Integration''': |
| − | [[File:Alphacom integration | + | [[File:Alphacom integration 10.JPG|thumb|left|500px|EMT - Add the AlphaCom node]] |
<br style="clear:both;" /> | <br style="clear:both;" /> | ||
| − | Type in the IP address of the AlphaCom. | + | Type in the '''IP address''' of the AlphaCom. |
=== Step 2. Action Calls === | === Step 2. Action Calls === | ||
For the AlphaCom to trigger features in the Exigo system one or more '''Action Calls''' needs to be added.<br> | For the AlphaCom to trigger features in the Exigo system one or more '''Action Calls''' needs to be added.<br> | ||
In Components view expand '''External Connections'''.<br> | In Components view expand '''External Connections'''.<br> | ||
| − | Drag '''Action Call''' to '''System''' | + | Drag '''Action Call''' to '''System''' > '''Integration''' > '''Action Calls''': |
| − | [[File:Alphacom integration | + | [[File:Alphacom integration 11.JPG|thumb|left|500px|EMT - Add Action Call]] |
<br style="clear:both;" /> | <br style="clear:both;" /> | ||
Then you can add input action to the '''Action Call'''. We will use '''Live Speech''' in this example.<br> | Then you can add input action to the '''Action Call'''. We will use '''Live Speech''' in this example.<br> | ||
In Components view expand '''Input action'''.<br> | In Components view expand '''Input action'''.<br> | ||
| − | Drag '''Live Speech''' to '''System''' | + | Drag '''Live Speech''' to '''System''' > '''Integration''' > '''Action Calls''' > '''980xx''' > '''On Connect''' |
[[File:Alphacom integration 12.JPG|thumb|left|500px|EMT - Add Live Speech]] | [[File:Alphacom integration 12.JPG|thumb|left|500px|EMT - Add Live Speech]] | ||
<br style="clear:both;" /> | <br style="clear:both;" /> | ||
| Line 83: | Line 106: | ||
* '''Priority''': Default priority is 50. | * '''Priority''': Default priority is 50. | ||
* '''Chime''': Select the desired chime. | * '''Chime''': Select the desired chime. | ||
| − | |||
Press '''Done'''.<br> | Press '''Done'''.<br> | ||
To make the '''Live Speech''' stop you also need to program '''Live Speech''' on disconnect.<br> | To make the '''Live Speech''' stop you also need to program '''Live Speech''' on disconnect.<br> | ||
| Line 91: | Line 113: | ||
Adding an '''AlphaCom Feature''' allows Exigo to trigger activities in the AlphaCom.<br> | Adding an '''AlphaCom Feature''' allows Exigo to trigger activities in the AlphaCom.<br> | ||
In Components view expand '''External Connections'''.<br> | In Components view expand '''External Connections'''.<br> | ||
| − | Drag '''Action Call''' to '''System''' | + | Drag '''Action Call''' to '''System''' > '''Integration''': |
[[File:Alphacom integration 13.JPG|thumb|left|500px|EMT - Add AlphaCom Feature]] | [[File:Alphacom integration 13.JPG|thumb|left|500px|EMT - Add AlphaCom Feature]] | ||
<br style="clear:both;" /> | <br style="clear:both;" /> | ||
| Line 103: | Line 125: | ||
[[File:Alphacom integration 14.JPG|thumb|left|500px|EMT - Add AlphaCom Feature to the Zone]] | [[File:Alphacom integration 14.JPG|thumb|left|500px|EMT - Add AlphaCom Feature to the Zone]] | ||
<br style="clear:both;" /> | <br style="clear:both;" /> | ||
| + | |||
| + | {{Note}} '''Changes to SIP configuration require a reboot of the Exigo System Controller.''' | ||
The group call from Exigo need to be adjusted on the AlphaCom.<br> | The group call from Exigo need to be adjusted on the AlphaCom.<br> | ||
| Line 112: | Line 136: | ||
Be sure to include the members that you want to be part of the group.<br> | Be sure to include the members that you want to be part of the group.<br> | ||
The Exigo - AlphaCom integration should now work. | The Exigo - AlphaCom integration should now work. | ||
| + | |||
| + | == Group Calls from AlphaCom to Exigo == | ||
| + | It may be useful to use Group Call to call from AlphaCom to Exigo. <br> | ||
| + | In order to make this work SIP Stations must be allowed in Group Calls. | ||
| + | [[File:Alphacom integration group call 1.PNG|thumb|left|500px|Allow SIP Stations in Group Calls]] | ||
| + | <br style="clear:both;" /> | ||
| + | In '''Exchange & System''' > '''System''' > '''VoIP''' <br> | ||
| + | Tick of '''Allow SIP Stations in Group Calls and as default speakers in SX Conference''' <br> | ||
| + | |||
| + | In the Group Call to Exigo the Automatic M-key must be ticked of. <br> | ||
| + | [[File:Alphacom integration group call 2.PNG|thumb|left|500px|Automatic M-key]] | ||
| + | <br style="clear:both;" /> | ||
| + | Automatic M-key from all stations (or alternative Automatic M-key only from SIP calls). | ||
== Exigo - AlphaCom Priorities == | == Exigo - AlphaCom Priorities == | ||
| Line 119: | Line 156: | ||
<br style="clear:both;" /> | <br style="clear:both;" /> | ||
| + | == Control output: Audio activity == | ||
| + | [[External Audio Sources | '''External Audio Sources''']] is used to make a control output trigger on an specified external audio source.<br> | ||
| + | External audio sources can be a station in an AlphaCom system or a station in a SIP system which is integrated into Exigo.<br> | ||
| + | An [[External_Audio_Sources|'''external audio source''']] must be defined in the Exigo system. This will be handled as any other source and can then be used to trigger control outputs depending on the [[Audio_Activity|'''audio activity function''']]. | ||
| + | |||
| + | == Availability == | ||
| + | This function is available from Exigo 1.3 and newer. | ||
[[Category:Getting started]] | [[Category:Getting started]] | ||
| + | [[Category:Integration]] | ||
Latest revision as of 13:59, 3 March 2020
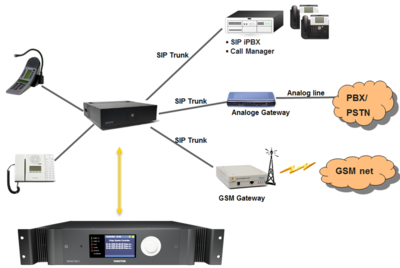
This article will explain how to setup and configure basic AlphaCom integration on a Exigo system.
Exigo and AlphaCom is integrated with each other using SIP.
The basic use cases for this integration is to do public announcement form the intercom and include intercoms in alarm distribution from Exigo.
 Before you start configure it is important that all Exigo devices have been updated to the latest software/firmware.
          Use only software/firmware from the same Exigo package.
For updates to the AlphaCom see this page.
Contents
Configuration Overview
Exigo Management Tool (EMT) is used for setting up the integration in Exigo.
AlphaPro is used for setting up the integration in AlphaCom.
The Web interface is used for all devices.
From Exigo there is two types of actions defined:
- Action Calls - from AlphaCom to Exigo.
- AlphaCom features - from Exigo to AlphaCom.
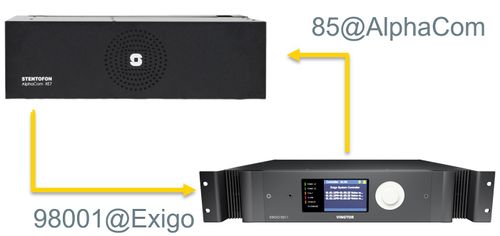
Exigo will use numbers from 98001 and upwards to start activities in Exigo on incoming activities. Outgoing from Exigo can define any number.
What the different directory numbers will trigger in the AlphaCom system is based on the configuration of the AlphaCom.
AlphaPro Configuration
Basic configuration on the AlphaCom contains two steps:
- Define and map IP addresses to the Exigo Node (the Exigo controller).
- Define and set up the group which Exigo should call.
Step 1. Define and map IP addresses to the Exigo Node
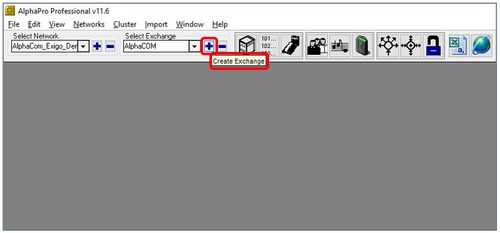
Select Create Exchange to create the Exigo SIP node in your AlphaCom system:
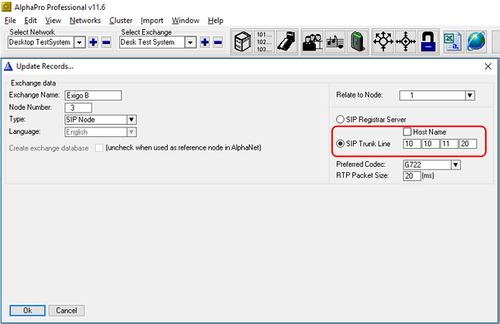
Set the IP adress for the Exigo PSC as the SIP Trunk Line:
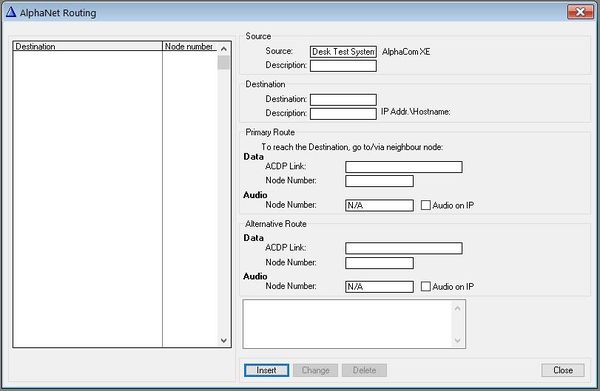
Set up Net Routing:
Go to Exchange & System > Net Routing:
Select Insert:
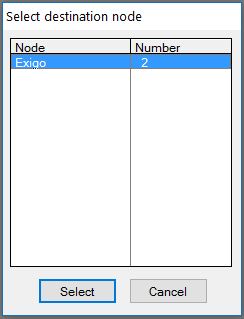
Select the Exigo node:
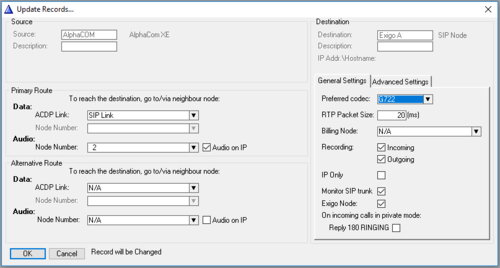
Select ACDP Link: SIP Link (31)
Also tick of Exigo Node
Press OK.
Step 2. Defining Directory Numbers
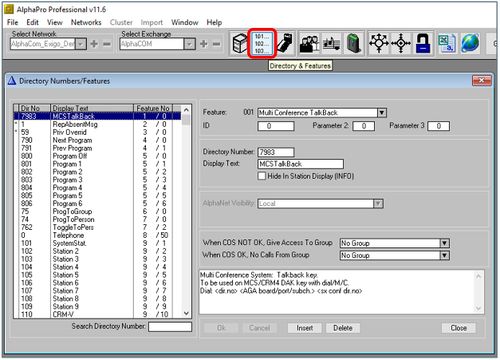
The next step is to add the directory numbers which are used in Exigo. These numbers are from 98001 to 98099.
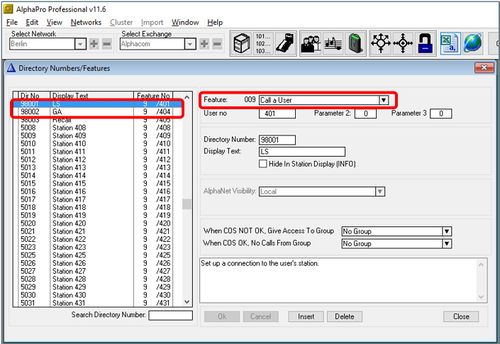
Select Directory and Features:
Here you need to add the number of directory numbers/Action Calls you need.
Add a directory number 98001 with feature number 9 (Call a User).
This will give you a number that are automatically in All Call 84, and can also be added to groups.
Give the Directory Number a descriptive text in Display Text.
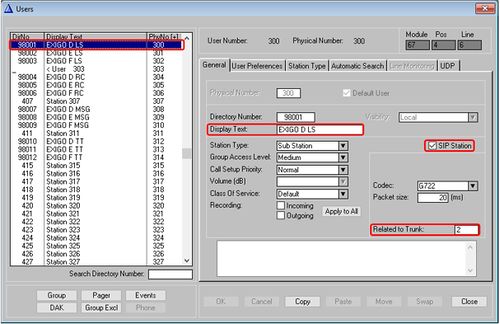
The User will look like this:
Check the SIP Station box.
The Related to Trunk must be set to the correct Exigo SIP Trunk.
EMT Configuration
There is 3 main configurations that needs to be done in EMT:
- The AlphaCom node needs to be added.
- Actions Calls and
- AlphaCom features also needs to be configured.
Step 1. Add the AlphaCom node
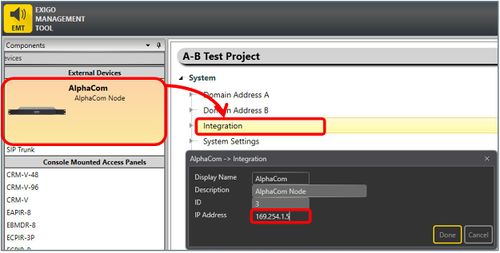
First step is to add the AlphaCom node to the system.
In Components view expand the External Devices.
Drag the AlphaCom to the System > Integration:
Type in the IP address of the AlphaCom.
Step 2. Action Calls
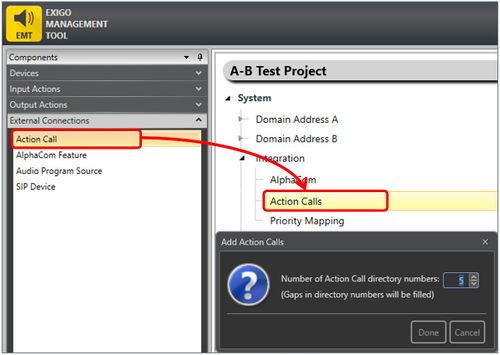
For the AlphaCom to trigger features in the Exigo system one or more Action Calls needs to be added.
In Components view expand External Connections.
Drag Action Call to System > Integration > Action Calls:
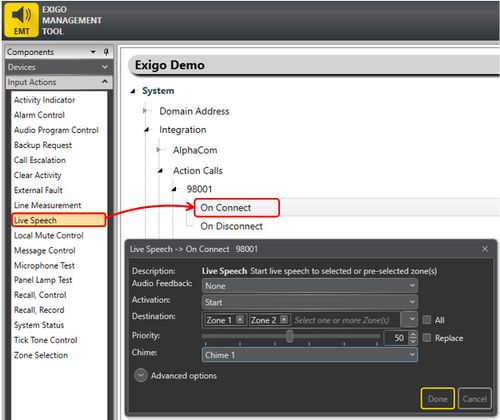
Then you can add input action to the Action Call. We will use Live Speech in this example.
In Components view expand Input action.
Drag Live Speech to System > Integration > Action Calls > 980xx > On Connect
In the pop up select:
- Activation: Start.
- Destination: The zones you want the Live Speech.
- Priority: Default priority is 50.
- Chime: Select the desired chime.
Press Done.
To make the Live Speech stop you also need to program Live Speech on disconnect.
This needs to have Activation: Stop.
Step 3. AlphaCom Feature
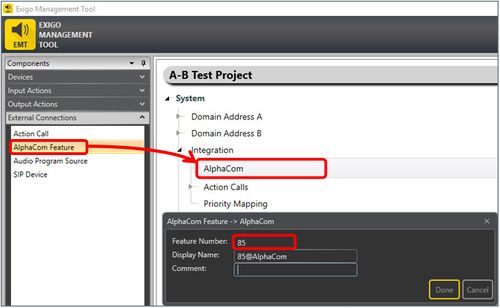
Adding an AlphaCom Feature allows Exigo to trigger activities in the AlphaCom.
In Components view expand External Connections.
Drag Action Call to System > Integration:
Each AlphaCom Feature relates to one feature number, typically a group number such as 85, 86 and so on.
In this example we will use the group number 85 to trigger a group call in AlphaCom.
Each AlphaCom Feature can be assigned to different zones in the system.
Best practice is to have a dedicated zone for the AlphaCom.
Add a new zone to the system and give it an descriptive name (for example AlphaCom).
Drag AlphaCom Feature to the new zone:
Changes to SIP configuration require a reboot of the Exigo System Controller.
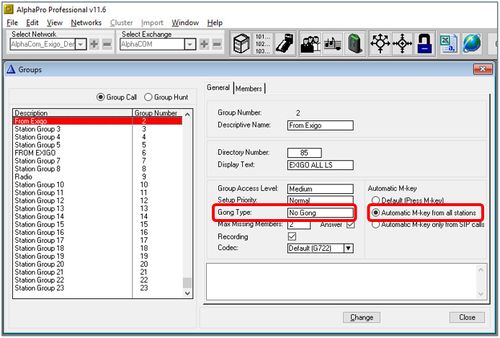
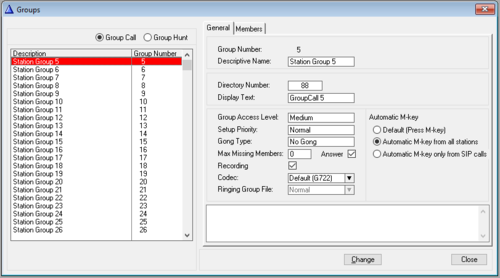
The group call from Exigo need to be adjusted on the AlphaCom.
In this example we have used group 85.
Exigo does not have an M key, and the group should therefore be set to Automatic M-key.
Best practice is to let the Exigo system control the gong. The AlphaCom group should therefore have No Gong set.
Be sure to include the members that you want to be part of the group.
The Exigo - AlphaCom integration should now work.
Group Calls from AlphaCom to Exigo
It may be useful to use Group Call to call from AlphaCom to Exigo.
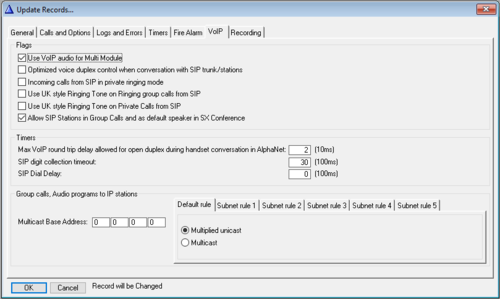
In order to make this work SIP Stations must be allowed in Group Calls.
In Exchange & System > System > VoIP
Tick of Allow SIP Stations in Group Calls and as default speakers in SX Conference
In the Group Call to Exigo the Automatic M-key must be ticked of.
Automatic M-key from all stations (or alternative Automatic M-key only from SIP calls).
Exigo - AlphaCom Priorities
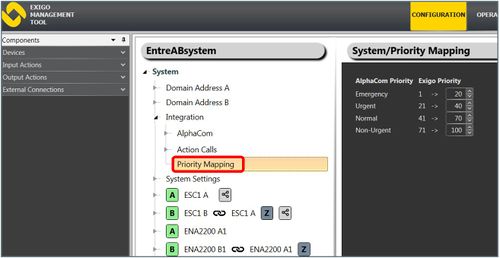
Exigo has 100 priorities while AlphaCom and SIP has 4.
Outgoing activities from Exigo will be translated based on a priority mapping:
Control output: Audio activity
External Audio Sources is used to make a control output trigger on an specified external audio source.
External audio sources can be a station in an AlphaCom system or a station in a SIP system which is integrated into Exigo.
An external audio source must be defined in the Exigo system. This will be handled as any other source and can then be used to trigger control outputs depending on the audio activity function.
Availability
This function is available from Exigo 1.3 and newer.
