Difference between revisions of "Secondary System Controller Update"
(→Installing a TFTP server on your PC) |
(→Upgrade from Version 1.2 to Exigo 1.3) |
||
| (16 intermediate revisions by the same user not shown) | |||
| Line 8: | Line 8: | ||
The '''Secondary System Controller''' is also called Turbine Board. | The '''Secondary System Controller''' is also called Turbine Board. | ||
| + | {{Note}} Before you start configure the Exigo system it is important that all devices have been updated to the latest software/firmware. <br> Use only software/firmware from the same Exigo package. | ||
| − | ==Upgrade using the Web Interface== | + | == Upgrade from Version 1.2 to Exigo 1.3 == |
| + | '''Precautions when upgrading from Exigo 1.2 to Exigo 1.3:''' | ||
| + | * '''Upgrade all devices before upgrading ESC1''' | ||
| + | If you have a complete system with a database you should upgrade all endpoints before upgrading [[ESC1]]. <br> | ||
| + | Upgrading [[ESC1]] first may cause trouble because all devices will connect to ESC1 and download their config. <br> | ||
| + | Downloading a Exigo 1.3 config to a device running Exigo 1.2 may cause problems. <br> | ||
| + | It is also possible to disconnect all devices in order to prevent them to download the configuration from ESC1. | ||
| + | |||
| + | * '''First update the bootloader enviroment''' | ||
| + | It is recommended to first update the bootlader enviroment. <br> | ||
| + | This is done by entering the image file prefixed by "boot" in the upgrade prosess. | ||
| + | |||
| + | [[File:Boot update 1.PNG|thumb|left|500px|Update bootloader enviroment]] | ||
| + | <br style="clear:both;" /> | ||
| + | After successfully update of the bootloader, proceed to the normal update procedure. | ||
| + | |||
| + | == Upgrade using the Web Interface == | ||
| + | === Attention === | ||
| + | When flashing new image ('''exi-4.2.2.3''' or newer) for the first time the bootloader must be updated first. <br> | ||
| + | This is done by entering '''boot/<image_name>''' ('''boot/exi-n.n.n.n''') in web upgrade image file field before upgrading image.<br> | ||
| + | To do a "clean" upgrade use exi image with switch: '''all/<image_name>''' ('''all/exi-n.n.n.n''') | ||
'''Prerequisites''' | '''Prerequisites''' | ||
# A TFTP Server must be available. A TFTP server can be downloaded from here: http://tftpd32.jounin.net/tftpd32_download.html | # A TFTP Server must be available. A TFTP server can be downloaded from here: http://tftpd32.jounin.net/tftpd32_download.html | ||
| − | # Download the latest Exigo firmware | + | # [[Downloads|Download]] the latest Exigo software/firmware package and unzip the folder. |
# Check if your local firewall is not blocking incoming ping/ICMP (Turbine station is pinging TFTP Server during update process). | # Check if your local firewall is not blocking incoming ping/ICMP (Turbine station is pinging TFTP Server during update process). | ||
| Line 21: | Line 42: | ||
[[File:TFTP_Server_1.png|thumb|left|500px|TFTP32]] | [[File:TFTP_Server_1.png|thumb|left|500px|TFTP32]] | ||
<br style="clear:both;" /> | <br style="clear:both;" /> | ||
| − | * Log on to the Secondary System Controller web interface. Default login credentials are '''admin''' and '''alphaadmin'''. Select Station Administration > Manual Upgrade | + | * Log on to the '''Secondary System Controller''' web interface. Default login credentials are '''admin''' and '''alphaadmin'''. Select '''Station Administration > Manual Upgrade''' |
* Enter the IP address of the TFTP server (I.e. the IP address of your PC) | * Enter the IP address of the TFTP server (I.e. the IP address of your PC) | ||
* Enter the image file: exi-x.x.x.x, and click Save settings | * Enter the image file: exi-x.x.x.x, and click Save settings | ||
| Line 28: | Line 49: | ||
<br style="clear:both;" /> | <br style="clear:both;" /> | ||
| − | The station will now contact the TFTP server and download the files. The upgrade procedure takes about 3 minutes. The process can be monitored by clicking the Log viewer tab in the TFTP server program. | + | The station will now contact the TFTP server and download the files. The upgrade procedure takes about 3 minutes. The process can be monitored by clicking the Log viewer tab in the TFTP server program. |
| − | ==Additional Information== | + | == Description of the exi-n.n.n.n package == |
| − | ===Installing a TFTP server on your PC=== | + | This software package is valid for following products "NAME(devicetree)": |
| + | * ENA2200(ena2) | ||
| + | * ENA2400(ena2) | ||
| + | * ESC1(esc) | ||
| + | * EAPIR-8(extended-exigopanel) | ||
| + | * ECPIR-3P(extended-exigopanel) | ||
| + | * ECPIR-P(extended-exigopanel) | ||
| + | * EAPFX-1(ex) | ||
| + | * EAPFX-6(ex) | ||
| + | * EAPII-1(extended-industrial) | ||
| + | * EAPII-6(extended-industrial) | ||
| + | * TKIS-2(compact) | ||
| + | |||
| + | === Alternative ways of upgrade === | ||
| + | ==== Alternative 1: upgrade only devtree & bootloader: ==== | ||
| + | Set image file to "devtreeboot/exi-x-x-x-x" | ||
| + | ==== Alternative 2: upgrade only devtree ==== | ||
| + | * Set image file to "compact/exi-x-x-x-x" | ||
| + | * Set image file to "extended/exi-x-x-x-x" | ||
| + | * Set image file to "extended-industrial/exi-x-x-x-x" | ||
| + | * Set image file to "extended-exigopanel/exi-x-x-x-x" | ||
| + | * Set image file to "ex/exi-x-x-x-x" | ||
| + | * Set image file to "ena2/exi-x-x-x-x" | ||
| + | * Set image file to "esc1/exi-x-x-x-x" | ||
| + | |||
| + | ==== Alternative 3: upgrade only bootloader ==== | ||
| + | Set image file to "boot/exi-x-x-x-x" | ||
| + | |||
| + | == Additional Information == | ||
| + | === Installing a TFTP server on your PC === | ||
* Download the TFTP Server program tftpd64 standard edition (installer) from http://tftpd32.jounin.net/tftpd32_download.html. | * Download the TFTP Server program tftpd64 standard edition (installer) from http://tftpd32.jounin.net/tftpd32_download.html. | ||
* For 32 bit computers download tftpd32 standard edition (installer) | * For 32 bit computers download tftpd32 standard edition (installer) | ||
| Line 39: | Line 89: | ||
* Select the base directory (e.g. C:\Software) by selecting the '''Settings > TFTP''', then '''Browse''' | * Select the base directory (e.g. C:\Software) by selecting the '''Settings > TFTP''', then '''Browse''' | ||
* The TFTP Server program must be running during the software upgrade process | * The TFTP Server program must be running during the software upgrade process | ||
| + | |||
| + | == Troubleshooting == | ||
| + | In the case the upgrade is not successful it may be due to a windows setting. | ||
| + | |||
| + | * For Windows XP: http://www.sysprobs.com/enable-ping-in-xp | ||
| + | * For Windows7: http://www.sysprobs.com/enable-ping-reply-windows-7 | ||
| + | * For Windows10: http://www.sysprobs.com/enable-ping-reply-and-ftp-traffic-in-windows-10-and-server | ||
[[Category:Software upgrade]] | [[Category:Software upgrade]] | ||
Latest revision as of 09:57, 22 December 2017
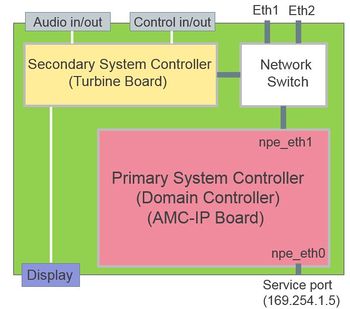
The Exigo System Controller consist of two main components:
- Primary System Controller, PSC
- Secondary System Controller, SSC
This article describes how to upgrade the software on the Secondary System Controller part of the Exigo System Controller. The Secondary System Controller is also called Turbine Board.
 Before you start configure the Exigo system it is important that all devices have been updated to the latest software/firmware.
          Use only software/firmware from the same Exigo package.
Contents
Upgrade from Version 1.2 to Exigo 1.3
Precautions when upgrading from Exigo 1.2 to Exigo 1.3:
- Upgrade all devices before upgrading ESC1
If you have a complete system with a database you should upgrade all endpoints before upgrading ESC1.
Upgrading ESC1 first may cause trouble because all devices will connect to ESC1 and download their config.
Downloading a Exigo 1.3 config to a device running Exigo 1.2 may cause problems.
It is also possible to disconnect all devices in order to prevent them to download the configuration from ESC1.
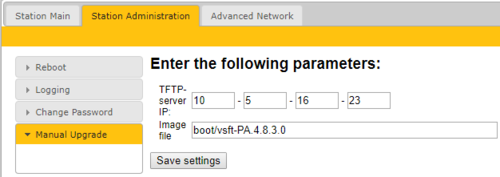
- First update the bootloader enviroment
It is recommended to first update the bootlader enviroment.
This is done by entering the image file prefixed by "boot" in the upgrade prosess.
After successfully update of the bootloader, proceed to the normal update procedure.
Upgrade using the Web Interface
Attention
When flashing new image (exi-4.2.2.3 or newer) for the first time the bootloader must be updated first.
This is done by entering boot/<image_name> (boot/exi-n.n.n.n) in web upgrade image file field before upgrading image.
To do a "clean" upgrade use exi image with switch: all/<image_name> (all/exi-n.n.n.n)
Prerequisites
- A TFTP Server must be available. A TFTP server can be downloaded from here: http://tftpd32.jounin.net/tftpd32_download.html
- Download the latest Exigo software/firmware package and unzip the folder.
- Check if your local firewall is not blocking incoming ping/ICMP (Turbine station is pinging TFTP Server during update process).
Upgrade procedure
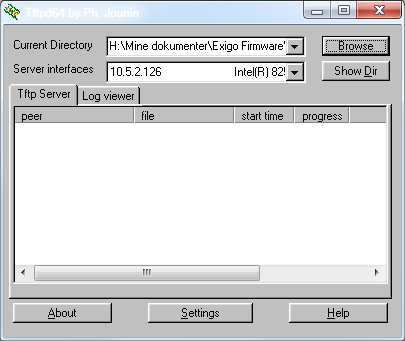
- Start the TFTP server program and click Browse, and select the folder where the latest version of exi-x.x.x.x software files are located
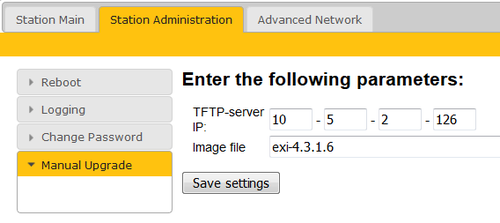
- Log on to the Secondary System Controller web interface. Default login credentials are admin and alphaadmin. Select Station Administration > Manual Upgrade
- Enter the IP address of the TFTP server (I.e. the IP address of your PC)
- Enter the image file: exi-x.x.x.x, and click Save settings
The station will now contact the TFTP server and download the files. The upgrade procedure takes about 3 minutes. The process can be monitored by clicking the Log viewer tab in the TFTP server program.
Description of the exi-n.n.n.n package
This software package is valid for following products "NAME(devicetree)":
- ENA2200(ena2)
- ENA2400(ena2)
- ESC1(esc)
- EAPIR-8(extended-exigopanel)
- ECPIR-3P(extended-exigopanel)
- ECPIR-P(extended-exigopanel)
- EAPFX-1(ex)
- EAPFX-6(ex)
- EAPII-1(extended-industrial)
- EAPII-6(extended-industrial)
- TKIS-2(compact)
Alternative ways of upgrade
Alternative 1: upgrade only devtree & bootloader:
Set image file to "devtreeboot/exi-x-x-x-x"
Alternative 2: upgrade only devtree
- Set image file to "compact/exi-x-x-x-x"
- Set image file to "extended/exi-x-x-x-x"
- Set image file to "extended-industrial/exi-x-x-x-x"
- Set image file to "extended-exigopanel/exi-x-x-x-x"
- Set image file to "ex/exi-x-x-x-x"
- Set image file to "ena2/exi-x-x-x-x"
- Set image file to "esc1/exi-x-x-x-x"
Alternative 3: upgrade only bootloader
Set image file to "boot/exi-x-x-x-x"
Additional Information
Installing a TFTP server on your PC
- Download the TFTP Server program tftpd64 standard edition (installer) from http://tftpd32.jounin.net/tftpd32_download.html.
- For 32 bit computers download tftpd32 standard edition (installer)
- Unzip the tftpdxx.yyy.zip file. (e.g. to C: \tftpdxx\)
- Run the tftpdxx.exe file. The program is run by selecting the extracted .exe file, no installation is needed.
- Turn off every thing except "TFTP Server" under Settings > Global. Escpecially important to turn off "DHCP Server", as this server part of the tftpxx application may interfere with other DHCP servers in the network
- Select the base directory (e.g. C:\Software) by selecting the Settings > TFTP, then Browse
- The TFTP Server program must be running during the software upgrade process
Troubleshooting
In the case the upgrade is not successful it may be due to a windows setting.
- For Windows XP: http://www.sysprobs.com/enable-ping-in-xp
- For Windows7: http://www.sysprobs.com/enable-ping-reply-windows-7
- For Windows10: http://www.sysprobs.com/enable-ping-reply-and-ftp-traffic-in-windows-10-and-server


