Difference between revisions of "Backup Amplifier"
(Tag: Visual edit) |
(→Hardware requirements) |
||
| (9 intermediate revisions by 2 users not shown) | |||
| Line 5: | Line 5: | ||
Exigo ENA Amplifiers offer up to 6+1 backup functionality. | Exigo ENA Amplifiers offer up to 6+1 backup functionality. | ||
| + | == Hardware requirements == | ||
| + | The backup functionality is supported by the following amplifiers: | ||
| + | * [[ENA2200]] | ||
| + | * [[ENA2400-DC]] | ||
| + | * [[ENA2400-AC]] | ||
| + | {{Note}} ''The ENA2100-AC cannot be used as a backup amplifier.'' | ||
| − | ==Functional | + | == Functional Description == |
| − | * When the backup amplifier functionality is activated the backup amplifier monitors the amplifier(s) it is | + | * When the backup amplifier functionality is activated, the backup amplifier monitors the amplifier(s) it is backing up for. |
| − | * If one of the amplifiers fails, it will take over the outputs and start sending the same audio as the | + | * If one of the amplifiers fails, it will take over the outputs and start sending the same audio as the failed amplifier. |
| − | * Both speaker loops of the | + | * Both speaker loops of the defective amplifier will be taken over by the backup amplifier. |
* Speaker monitoring will be suspended when the amplifier is taken over. | * Speaker monitoring will be suspended when the amplifier is taken over. | ||
| Line 15: | Line 21: | ||
[[File:Backup amplifier 2.JPG|thumb|left|500px|Backup Amplifier functionality is triggered]] | [[File:Backup amplifier 2.JPG|thumb|left|500px|Backup Amplifier functionality is triggered]] | ||
<br style="clear:both;" /> | <br style="clear:both;" /> | ||
| − | The | + | The figure shows an example of how one backup amplifier takes over the output stage on one (number 4) of the amplifiers it is backing up for. |
Faults such as power faults, faults affecting the internal amplifier module and loss of network connection will trigger the backup functionality. | Faults such as power faults, faults affecting the internal amplifier module and loss of network connection will trigger the backup functionality. | ||
| − | The backup amplifier is responsible for monitoring the amplifiers and | + | The backup amplifier is responsible for monitoring the amplifiers and triggering the backup functionality. |
| − | In addition, an optional function on a control input on the backup amplifier can trigger the backup functionality. This will ensure an even faster switch-over if the | + | In addition, an optional function on a control input on the backup amplifier can trigger the backup functionality. This will ensure an even faster switch-over if the defective amplifier has a power issue. |
| − | In situations where more than one amplifier is | + | In situations where more than one amplifier is defective, the backup amplifier will take over for the first defective amplifier unless priorities are activated. If priorities are activated, the backup amplifier will take over for the defective amplifier with the highest priority and, if already activated, release defective amplifiers with lower priority. |
| − | ==Configuration== | + | The Blue '''IN COMMAND''' LED will be lit when backup amplifier have taken over another amplifier. |
| + | |||
| + | == Prerequisite == | ||
| + | In order for the backup amplifier with functionality to work on the ENA2200 amplifiers they must have revision number 204 (or higher). | ||
| + | [[File:ENA revision number.PNG|thumb|left|400px|ENA2200 revision number location]] | ||
| + | <br style="clear:both;" /> | ||
| + | The revision number can be found on back of the amplifier. <br> | ||
| + | The last digits in the item number is the revision number.<br> | ||
| + | Please contact customer support if you have amplifiers with revision number 203 and you want to use this with the backup amplifier solution. | ||
| + | |||
| + | == Configuration == | ||
See [[Backup_Amplifier_Configuration]] for details on how to configure the backup amplifier functionality. | See [[Backup_Amplifier_Configuration]] for details on how to configure the backup amplifier functionality. | ||
| − | ==Connections== | + | == Connections == |
See [[Backup_Amplifier_Wiring]] for details on how to wire the system to use backup amplifier functionality. | See [[Backup_Amplifier_Wiring]] for details on how to wire the system to use backup amplifier functionality. | ||
| − | ==Control | + | == Control Inputs and Control Outputs == |
| − | Spare control inputs or control outputs on the backup amplifier can be used for other functions in the Exigo system | + | Spare control inputs or control outputs on the backup amplifier can be used for other functions in the Exigo system such as volume controls and starting activities. |
| − | On the normal amplifiers, control inputs and control outputs not used for backup functionality can be used for other functions. These will work as normal as long as the amplifier | + | On the normal amplifiers, control inputs and control outputs that are not used for the backup functionality can be used for other functions. These will work as normal as long as the amplifier has power and network connection. |
| − | ==Resetting the | + | == Resetting the Amplifier Functionality == |
| − | After | + | After the defective amplifier is fixed, manual intervention is required to reset the backup amplifier functionality. This is done by accessing the user interface on the front panel of the backup amplifier. |
[[File:Backup amplifier 3.png|thumb|left|500px|ENA GUI - R : Indicates replaced amplifier - green background]] | [[File:Backup amplifier 3.png|thumb|left|500px|ENA GUI - R : Indicates replaced amplifier - green background]] | ||
<br style="clear:both;" /> | <br style="clear:both;" /> | ||
| − | + | Automatic replacement of amplifiers will only take effect if the amplifier has status '''Disconnected''' or '''Amp Fault'''.<br> | |
Select the amplifier that you want to release.<br> | Select the amplifier that you want to release.<br> | ||
Select '''Yes''' in the pop up window: | Select '''Yes''' in the pop up window: | ||
[[File:Backup amplifier 4.png|thumb|left|500px|ENA GUI - Release replaced amplifier]] | [[File:Backup amplifier 4.png|thumb|left|500px|ENA GUI - Release replaced amplifier]] | ||
<br style="clear:both;" /> | <br style="clear:both;" /> | ||
| − | After the reset the backup amplifier will | + | After the reset, the backup amplifier will return to standby mode and be ready to take over other defective amplifiers. |
| + | |||
| + | == Availability == | ||
| + | This functionality is available from Exigo 1.3 and later. | ||
[[Category:Exigo features]] | [[Category:Exigo features]] | ||
Latest revision as of 13:26, 14 December 2018
This article describes how the backup amplifier functionality works.
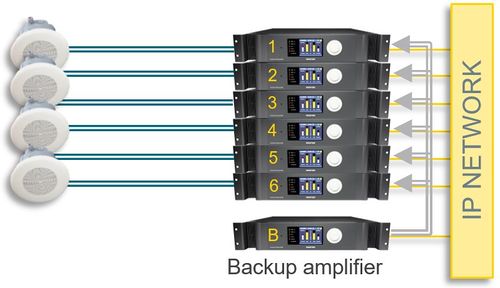
Exigo ENA Amplifiers have inbuilt support for backup amplifier switch-over where one amplifier can be designated as backup for up to six other amplifiers.
If there is a problem in one of these amplifiers, the backup amplifier will take over the configuration and output stage of the defective amplifier and continue distributing audio out on the speaker loops.
Exigo ENA Amplifiers offer up to 6+1 backup functionality.
Contents
Hardware requirements
The backup functionality is supported by the following amplifiers:
The ENA2100-AC cannot be used as a backup amplifier.
Functional Description
- When the backup amplifier functionality is activated, the backup amplifier monitors the amplifier(s) it is backing up for.
- If one of the amplifiers fails, it will take over the outputs and start sending the same audio as the failed amplifier.
- Both speaker loops of the defective amplifier will be taken over by the backup amplifier.
- Speaker monitoring will be suspended when the amplifier is taken over.
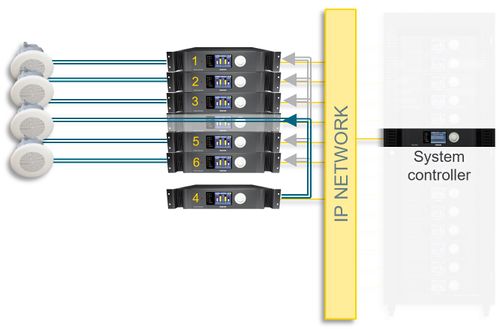
The figure shows an example of how one backup amplifier takes over the output stage on one (number 4) of the amplifiers it is backing up for.
Faults such as power faults, faults affecting the internal amplifier module and loss of network connection will trigger the backup functionality.
The backup amplifier is responsible for monitoring the amplifiers and triggering the backup functionality.
In addition, an optional function on a control input on the backup amplifier can trigger the backup functionality. This will ensure an even faster switch-over if the defective amplifier has a power issue.
In situations where more than one amplifier is defective, the backup amplifier will take over for the first defective amplifier unless priorities are activated. If priorities are activated, the backup amplifier will take over for the defective amplifier with the highest priority and, if already activated, release defective amplifiers with lower priority.
The Blue IN COMMAND LED will be lit when backup amplifier have taken over another amplifier.
Prerequisite
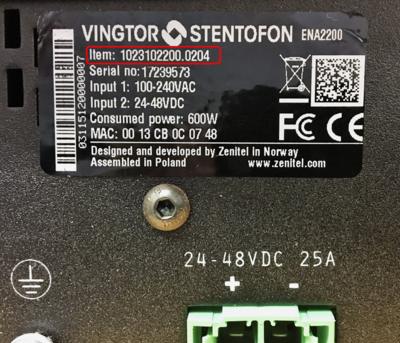
In order for the backup amplifier with functionality to work on the ENA2200 amplifiers they must have revision number 204 (or higher).
The revision number can be found on back of the amplifier.
The last digits in the item number is the revision number.
Please contact customer support if you have amplifiers with revision number 203 and you want to use this with the backup amplifier solution.
Configuration
See Backup_Amplifier_Configuration for details on how to configure the backup amplifier functionality.
Connections
See Backup_Amplifier_Wiring for details on how to wire the system to use backup amplifier functionality.
Control Inputs and Control Outputs
Spare control inputs or control outputs on the backup amplifier can be used for other functions in the Exigo system such as volume controls and starting activities.
On the normal amplifiers, control inputs and control outputs that are not used for the backup functionality can be used for other functions. These will work as normal as long as the amplifier has power and network connection.
Resetting the Amplifier Functionality
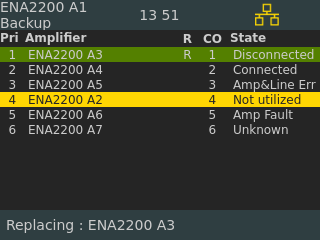
After the defective amplifier is fixed, manual intervention is required to reset the backup amplifier functionality. This is done by accessing the user interface on the front panel of the backup amplifier.
Automatic replacement of amplifiers will only take effect if the amplifier has status Disconnected or Amp Fault.
Select the amplifier that you want to release.
Select Yes in the pop up window:
After the reset, the backup amplifier will return to standby mode and be ready to take over other defective amplifiers.
Availability
This functionality is available from Exigo 1.3 and later.


