Difference between revisions of "Setting up a small system"
Jump to navigation
Jump to search
| Line 1: | Line 1: | ||
| − | + | ||
This page will explain how to configure and test a small Exigo system. | This page will explain how to configure and test a small Exigo system. | ||
| Line 38: | Line 38: | ||
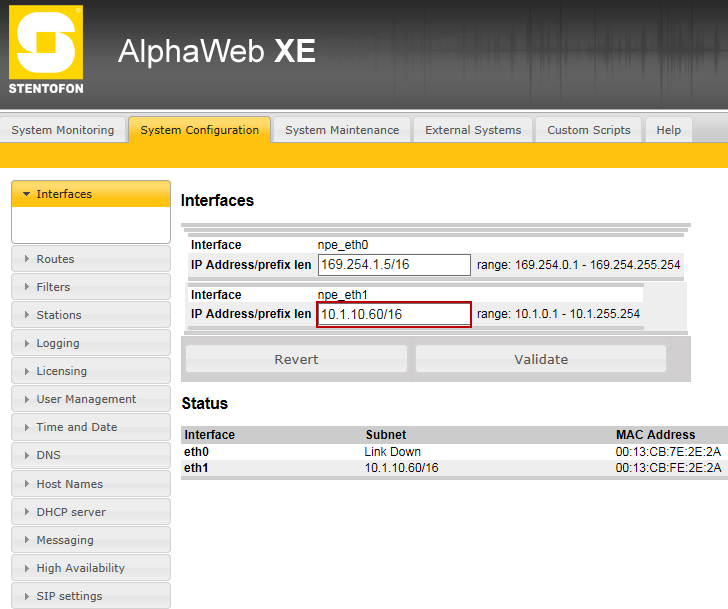
# Select System Configuration > Interfaces | # Select System Configuration > Interfaces | ||
| − | [[File: | + | [[File:Amc IP Interface 1.png|left]] |
<br style="clear:both;" /> | <br style="clear:both;" /> | ||
| + | * Enter the appropriate IP address (obtained from system administrator) in the npe_eth1 field | ||
| + | |||
| + | [[Category:How-To]] | ||
Revision as of 10:16, 21 June 2016
This page will explain how to configure and test a small Exigo system.
Step 1: IP addresse
Each device will need to be configured with an IP address and subnet which is in range of the AMC-IP card.
Table below lists IP range for a small system with one amplifier and on access panel. All subnets are set to 255.255.255.0
| Device | IP | Dirctory number |
|---|---|---|
| PSC | 10.1.0.21 | |
| ESC-1 | 10.1.0.20 | 013010 |
| ENA | 10.1.0.30 | 012010 |
| ECPIR-3P | 10.1.0.50 | 011010 |
Step 2: Primary System Controller
Open up the front of the ESC1 Controller. Connect your computer to eth0.
- Open a web browser and enter the default IP address of port npe_eth0: 169.254.1.5
- Log in with username: admin and password: alphaadmin
- Select System Configuration > Interfaces

- Enter the appropriate IP address (obtained from system administrator) in the npe_eth1 field