Difference between revisions of "Follow Any Alarm Tone"
(→Follow alarm tone in Zone 1) (Tag: Visual edit) |
(Tag: Visual edit) |
||
| Line 7: | Line 7: | ||
==Assigning Follow Any Alarm Tone to a Control Output== | ==Assigning Follow Any Alarm Tone to a Control Output== | ||
| − | To assign the function Follow Any Alarm Tone to | + | To assign the function Follow Any Alarm Tone to a Control Output: |
#In '''Components''' view, open '''Output Actions''' | #In '''Components''' view, open '''Output Actions''' | ||
| − | #In '''System''', identify the Controller, the Amplifier or the Access Panel to be used, and expand to '''Device > Control Outputs''' | + | #In '''System''', identify the Controller, the Amplifier or the Access Panel to be used, and expand to '''Device''' > '''Control Outputs''' |
#Drag '''Follow Any Alarm Tone''' to the '''Control Output''' you want to use. | #Drag '''Follow Any Alarm Tone''' to the '''Control Output''' you want to use. | ||
[[File:Follow-any.png|left|thumb|583x583px|Assigning Follow Any Alarm Tone function to a Control Output]] | [[File:Follow-any.png|left|thumb|583x583px|Assigning Follow Any Alarm Tone function to a Control Output]] | ||
| Line 15: | Line 15: | ||
==Configuration== | ==Configuration== | ||
| − | ===Follow | + | ===Follow Alarm Tone in Zone 1=== |
| − | #Drag '''Follow Any Alarm Tone''' to the desired Control Output | + | #Drag '''Follow Any Alarm Tone''' to the desired Control Output |
| − | #Select the desired Alarm (or Any) in '''Source''' | + | #Select the desired Alarm (or Any) in '''Source''' |
| − | #Select Zone 1 in ''' Zone''' | + | #Select '''Zone 1''' in ''' Zone''' |
[[File:Follow-any-param.png|left|thumb|500x500px|The specified alarm tone in Zone 1 will trigger Control Output 1]] | [[File:Follow-any-param.png|left|thumb|500x500px|The specified alarm tone in Zone 1 will trigger Control Output 1]] | ||
<br style="clear:both;" /> | <br style="clear:both;" /> | ||
| − | In this example | + | In this example '''General Alarm, Ship''' in '''Zone 1''' will trigger '''Control Output 1'''. |
| − | ==Parameter | + | ==Parameter Details== |
| − | '''Idle State:''' Sets the idle state for the output. The options are Normally Open or Normally Closed | + | '''Idle State:''' Sets the idle state for the output. The options are '''Normally Open''' or '''Normally Closed''' |
| − | '''Source:''' The source that will trigger the alarm output. | + | '''Source:''' The source that will trigger the alarm output. If Source is not specified, it will be ignored when checking whether the conditions for the audio activity triggering are present or not. |
| − | If Source is not specified, it will be ignored when checking whether the conditions for the audio activity triggering are present or not. | ||
| − | '''Zone:''' The zones in which the output on an activity is triggered. | + | '''Zone:''' The zones in which the output on an activity is triggered. If Zone is not specified, it will be ignored when checking whether the conditions for the audio activity triggering are present or not. Note that only one zone can be specified. |
| − | If Zone is not specified, it will be ignored when checking whether the conditions for the audio activity triggering are present or not. Note that only one zone can be specified. | ||
'''Priority Range:''' The priority range within which the activity is triggered. | '''Priority Range:''' The priority range within which the activity is triggered. | ||
| Line 38: | Line 36: | ||
===Advanced Options:=== | ===Advanced Options:=== | ||
::'''Limit High Not OK:''' When the Control Output is cleared, and feedback voltage is at or above this value, the output is considered fed with alien voltage. | ::'''Limit High Not OK:''' When the Control Output is cleared, and feedback voltage is at or above this value, the output is considered fed with alien voltage. | ||
| − | |||
::'''Limit Low OK:''' When the Control Output is set, and feedback voltage is above this value, the output is considered active OK. | ::'''Limit Low OK:''' When the Control Output is set, and feedback voltage is above this value, the output is considered active OK. | ||
| − | == Example of | + | == Example of Use: == |
| − | === Case 1: Any | + | === Case 1: Any Alarm in One Zone === |
| − | It is common in noisy areas to add flashing lights or beacons which will indicate when there | + | It is common in noisy areas to add flashing lights or beacons which will indicate when there is activity on the PA.<br> |
The "follow any alarm" function can in this case be used to pulse the flashing light in the same pattern as a any alarm sent to the zone.<br> | The "follow any alarm" function can in this case be used to pulse the flashing light in the same pattern as a any alarm sent to the zone.<br> | ||
The configuration will then have: | The configuration will then have: | ||
* Source: | * Source: | ||
* Destination: "Noisy zone 1" | * Destination: "Noisy zone 1" | ||
| − | * Priority | + | * Priority Range: 1-40 |
| − | * Follow | + | * Follow Alarm Tone: checked |
| − | Leaving | + | Leaving Source empty will indicate that any alarm shall toggle this. With this setup the control output will trigger in the same pattern as any alarm tone sent to the zone.<br> |
For a general alarm (7 short burst, one long burst) the people in the area will then see the type of alarm which is active. | For a general alarm (7 short burst, one long burst) the people in the area will then see the type of alarm which is active. | ||
| − | === Case 2: Two | + | === Case 2: Two Alarms in One Zone === |
| − | It is common in noisy areas to add flashing lights or beacons which will indicate when there | + | It is common in noisy areas to add flashing lights or beacons which will indicate when there is activity on the PA.<br> |
The "follow any alarm" function can in this case be used to pulse the flashing light in the same pattern as a any alarm sent to the zone.<br> | The "follow any alarm" function can in this case be used to pulse the flashing light in the same pattern as a any alarm sent to the zone.<br> | ||
The configuration will then have: | The configuration will then have: | ||
* Source: General alarm, MOB alarm | * Source: General alarm, MOB alarm | ||
* Destination: "Noisy zone 1" | * Destination: "Noisy zone 1" | ||
| − | * Priority | + | * Priority Range: 1-40 |
| − | * Follow | + | * Follow Alarm Tone: checked |
| − | With this setup the control output will trigger in the same pattern as either the General alarm or the MOB alarm sent to the "Noisy zone 1" zone. The people in the area will then see the type of alarm | + | With this setup the control output will trigger in the same pattern as either the General alarm or the MOB alarm sent to the "Noisy zone 1" zone. The people in the area will then see the type of alarm that is active. |
[[Category:Exigo features]] | [[Category:Exigo features]] | ||
[[Category:Output Actions]] | [[Category:Output Actions]] | ||
Revision as of 17:22, 15 March 2017
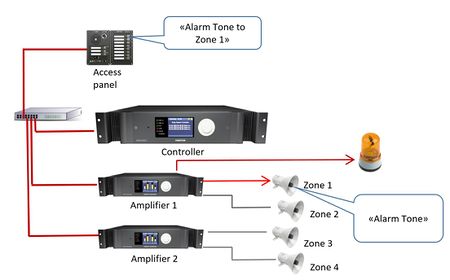
The Output Action Follow Any Alarm Tone function is used to trigger the control output to follow one, many or any Alarm Tone in one specific zone. It differs from Output Action Follow One Alarm Tone in that it can only follow alarms in one zone.
This function can be useful in providing visual indications in noisy areas.
Contents
Assigning Follow Any Alarm Tone to a Control Output
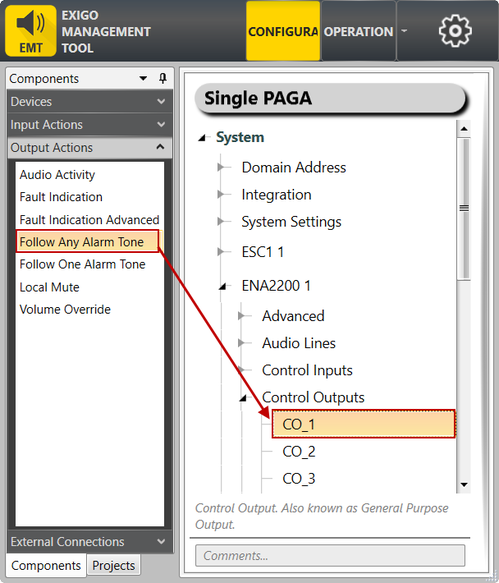
To assign the function Follow Any Alarm Tone to a Control Output:
- In Components view, open Output Actions
- In System, identify the Controller, the Amplifier or the Access Panel to be used, and expand to Device > Control Outputs
- Drag Follow Any Alarm Tone to the Control Output you want to use.
Configuration
Follow Alarm Tone in Zone 1
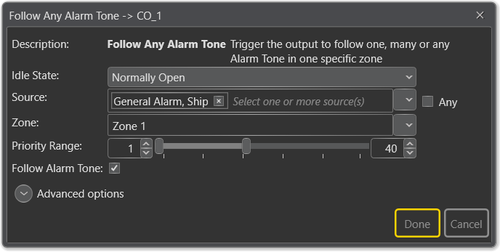
- Drag Follow Any Alarm Tone to the desired Control Output
- Select the desired Alarm (or Any) in Source
- Select Zone 1 in Zone
In this example General Alarm, Ship in Zone 1 will trigger Control Output 1.
Parameter Details
Idle State: Sets the idle state for the output. The options are Normally Open or Normally Closed
Source: The source that will trigger the alarm output. If Source is not specified, it will be ignored when checking whether the conditions for the audio activity triggering are present or not.
Zone: The zones in which the output on an activity is triggered. If Zone is not specified, it will be ignored when checking whether the conditions for the audio activity triggering are present or not. Note that only one zone can be specified.
Priority Range: The priority range within which the activity is triggered.
Advanced Options:
- Limit High Not OK: When the Control Output is cleared, and feedback voltage is at or above this value, the output is considered fed with alien voltage.
- Limit Low OK: When the Control Output is set, and feedback voltage is above this value, the output is considered active OK.
Example of Use:
Case 1: Any Alarm in One Zone
It is common in noisy areas to add flashing lights or beacons which will indicate when there is activity on the PA.
The "follow any alarm" function can in this case be used to pulse the flashing light in the same pattern as a any alarm sent to the zone.
The configuration will then have:
- Source:
- Destination: "Noisy zone 1"
- Priority Range: 1-40
- Follow Alarm Tone: checked
Leaving Source empty will indicate that any alarm shall toggle this. With this setup the control output will trigger in the same pattern as any alarm tone sent to the zone.
For a general alarm (7 short burst, one long burst) the people in the area will then see the type of alarm which is active.
Case 2: Two Alarms in One Zone
It is common in noisy areas to add flashing lights or beacons which will indicate when there is activity on the PA.
The "follow any alarm" function can in this case be used to pulse the flashing light in the same pattern as a any alarm sent to the zone.
The configuration will then have:
- Source: General alarm, MOB alarm
- Destination: "Noisy zone 1"
- Priority Range: 1-40
- Follow Alarm Tone: checked
With this setup the control output will trigger in the same pattern as either the General alarm or the MOB alarm sent to the "Noisy zone 1" zone. The people in the area will then see the type of alarm that is active.


