Difference between revisions of "Analog radio integration"
(→Audio from Exigo to Radio using ESC1) |
(→Wiring) |
||
| Line 7: | Line 7: | ||
===Wiring=== | ===Wiring=== | ||
| − | [[File:Radio Interface Exigo.JPG|600px|thumb|left|alt=Radio interface from ESC-1 to GM360|Radio interface from | + | [[File:Radio Interface Exigo.JPG|600px|thumb|left|alt=Radio interface from ESC-1 to GM360|Radio interface from ESC1 to GM360]] |
<br style="clear:both;" /> | <br style="clear:both;" /> | ||
| − | Diagram shows wiring from | + | Diagram shows wiring from ESC1 to a GM360 radio. The same principle can be used for other radios from different manufacturers.<br> |
| − | Other Exigo devices such as kits can be used instead of ESC1 when required. This is especially useful when the radio is located far from the | + | Other Exigo devices such as kits can be used instead of ESC1 when required. This is especially useful when the radio is located far from the ESC1. |
== Configuration == | == Configuration == | ||
Revision as of 15:57, 7 December 2016
This article describes how to set up analog radio integration in Exigo.
Exigo can be integrated with analog radio solutions by using control outputs and control inputs.
Audio from Exigo to Radio using ESC1
Audio from Exigo can be sent out on a radio. The radio will then be a special zone which are only used for radio.
Wiring
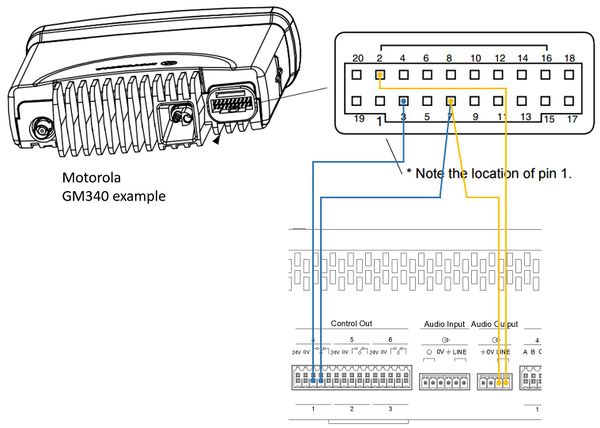
Diagram shows wiring from ESC1 to a GM360 radio. The same principle can be used for other radios from different manufacturers.
Other Exigo devices such as kits can be used instead of ESC1 when required. This is especially useful when the radio is located far from the ESC1.
Configuration
Radio integration is for Exigo the same as any other analog audio integration.
1. Assign the line output to a zone. No other audio channels need to be part of this zone
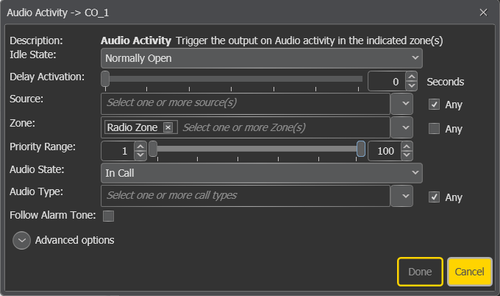
2. Program audio activity on the control output which is used.
2a. In Zone add the zone which contains the line output.
2b. Set priority range to 1-100. All audio sent to the radio zone will now trigger the control output which will key the radio.

