Difference between revisions of "Setting up a small A-B system"
Jump to navigation
Jump to search
(→Step 1: IP address) |
|||
| Line 20: | Line 20: | ||
!Directory number | !Directory number | ||
|- | |- | ||
| − | |PSC | + | |PSC System A |
|10.1.0.21 | |10.1.0.21 | ||
| | | | ||
|- | |- | ||
| − | |ESC-1 | + | |ESC-1 System A |
|10.1.0.20 | |10.1.0.20 | ||
|013010 | |013010 | ||
|- | |- | ||
| − | |ENA | + | |ENA 1 System A |
| + | |10.1.0.30 | ||
| + | |012010 | ||
| + | |- | ||
| + | |ENA 2 System A | ||
|10.1.0.30 | |10.1.0.30 | ||
|012010 | |012010 | ||
Revision as of 11:32, 22 August 2016
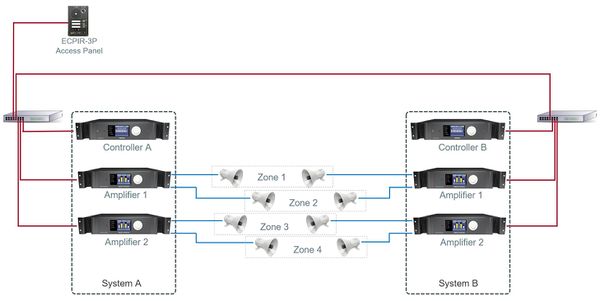
This article will explain how to setup and configure a small Exigo A-B system.
System A will have one ESC1 Controller and two ENA2200 Amplifiers.
System B will have one ESC1 Controller and two ENA2200 Amplifiers.
In addition there will be one ECPR-3P connected to the system.
The system will be programmed with 4 Zones.
With the PPT button we will configure Live Speech on all zones.
Before you start configure make sure that all devices have been updated to the latest software/firmware.
Step 1: IP address
Each device will need to be configured with an IP address and subnet which is in range of the AMC-IP card.
Table below lists IP range for a small system with one amplifier and on access panel. All subnets are set to 255.255.255.0
| Device | IP | Directory number |
|---|---|---|
| PSC System A | 10.1.0.21 | |
| ESC-1 System A | 10.1.0.20 | 013010 |
| ENA 1 System A | 10.1.0.30 | 012010 |
| ENA 2 System A | 10.1.0.30 | 012010 |
| ECPIR-3P | 10.1.0.50 | 011010 |
