Difference between revisions of "Redundant AlphaCom integration"
(→Step 2. Defining Directory Numbers) |
|||
| (43 intermediate revisions by the same user not shown) | |||
| Line 1: | Line 1: | ||
This article explains how to setup and configure redundant AlphaCom integration on an Exigo A-B system.<br> | This article explains how to setup and configure redundant AlphaCom integration on an Exigo A-B system.<br> | ||
| − | The solution may also be used for Exigo system with hot-standby controller. | + | The solution may also be used for Exigo system with hot-standby controller.<br> |
| − | + | Redundant AlphaCom integration is obtain as follows: | |
| + | * From AlphaCom to Exigo -> The AlphaCom calls both Exigo Controllers simultaneously.<br> | ||
| + | * From Exigo to AlphaCom -> Calls from Exigo is sent to the AlphaCom from both Exigo controllers.<br> | ||
| + | If one of the Exigo Controllers fails you will still have integration between AlphaCom and the Exigo system. | ||
== Configuration Overview == | == Configuration Overview == | ||
| − | Exigo Management Tool (EMT) is used for setting up the integration | + | Exigo Management Tool (EMT) is used for setting up the integration in Exigo. |
[[File:Redundant alphacom integration 1.PNG|thumb|left|700px|EMT]] | [[File:Redundant alphacom integration 1.PNG|thumb|left|700px|EMT]] | ||
<br style="clear:both;" /> | <br style="clear:both;" /> | ||
| − | AlphaPro is used for setting up the integration | + | AlphaPro is used for setting up the integration in AlphaCom. |
[[File:Alphacom integration 3.JPG|thumb|left|500px|AlphaPro]] | [[File:Alphacom integration 3.JPG|thumb|left|500px|AlphaPro]] | ||
<br style="clear:both;" /> | <br style="clear:both;" /> | ||
| Line 16: | Line 19: | ||
* '''AlphaCom features''' - from Exigo to AlphaCom. | * '''AlphaCom features''' - from Exigo to AlphaCom. | ||
| − | Exigo will use numbers from '''98001''' | + | Exigo will use numbers from '''98001''' to '''98099''' to start activities in Exigo on incoming activities.<br> |
Outgoing from Exigo can define any number. | Outgoing from Exigo can define any number. | ||
| + | == AlphaPro Configuration == | ||
| + | Configuration on the AlphaCom with redundant call to Exigo contains three steps: | ||
| + | * Define and map IP addresses to the two Exigo Nodes (Controller A and Controller B). | ||
| + | * Defining Directory Numbers. | ||
| + | * Make a Group Call that calls both controllers. | ||
| + | |||
| + | === Step 1. Define and map IP addresses to the first Exigo Node (Controller A) === | ||
| + | The following steps needs to be repeated for '''Controller B'''.<br> | ||
| + | Select '''Create Exchange''' to create the first Exigo SIP node in your AlphaCom system: | ||
| + | [[File:Alphacom integration 5.JPG|thumb|left|500px|AlphaPro - Create exchange]] | ||
| + | <br style="clear:both;" /> | ||
| − | + | Set the IP adress for the first '''Exigo PSC''' (Controller A) as the '''SIP Trunk Line''': | |
| − | + | [[File:Alphacom integration 6.JPG|thumb|left|500px|AlphaPro - Set the Exigo PSC IP address as the SIP Trunk Line]] | |
| − | + | <br style="clear:both;" /> | |
| − | |||
| + | Set up Net Routing:<br> | ||
| + | Go to '''Exchange & System''' -> '''Net Routing''': | ||
| + | [[File:Alphacom integration net routing 1.JPG|thumb|left|600px|AlphaPro - Setup the Net Routing]] | ||
| + | <br style="clear:both;" /> | ||
| + | Select '''Insert''':<br> | ||
| + | Select the Exigo node:<br> | ||
| + | [[File:Alphacom integration net routing 2.JPG|thumb|left|400px|AlphaPro - Setup the Net Routing]] | ||
| + | <br style="clear:both;" /> | ||
| + | Select '''ACDP Link: SIP Link (31)''' <br> | ||
| + | [[File:Alphacom integration net routing 3.PNG|thumb|left|500px|AlphaPro - Setup the Net Routing]] | ||
| + | <br style="clear:both;" /> | ||
| + | Press '''OK'''. <br> | ||
| + | {{Note}} The steps above must then be repeated for '''Controller B'''. | ||
| − | + | After adding both controllers you should now have two Exigo nodes: | |
| + | [[File:Alphacom integration net routing 4.JPG|thumb|left|500px|Net Routing - both controllers]] | ||
| + | <br style="clear:both;" /> | ||
| + | === Step 2. Defining Directory Numbers === | ||
| + | In order to achieve redundancy the AlphaCom needs to call both controllers at the same time.<br> | ||
| + | The next step is to add the directory numbers which are used in Exigo. These numbers are from '''98001''' to '''98099'''.<br> | ||
| + | Select Directory and Features: | ||
| + | [[File:Alphacom integration 7.JPG|thumb|left|500px|AlphaPro - Directory and Features]] | ||
| + | <br style="clear:both;" /> | ||
| + | Here you need to add the number of directory numbers/'''Action Calls''' you need.<br> | ||
| + | For redundancy you need to add minimum two numbers (for example 98001 and 98002).<br> | ||
| + | 98001 will then call Controller A, and 98002 will call Controller B.<br> | ||
| + | Add a directory number '''98001''' with '''feature number 9 (Call a User)'''.<br> | ||
| + | [[File:Alphacom integration 8.JPG|thumb|left|500px|AlphaPro - Directory and Features]] | ||
| + | <br style="clear:both;" /> | ||
| − | + | This will give you a number that are automatically in All Call 84, and can also be added to groups.<br> | |
| + | Give the '''Directory Number''' a descriptive text in '''Display Text'''.<br> | ||
| + | The '''User''' will look like this: | ||
| + | [[File:Alphacom integration 9.JPG|thumb|left|500px|AlphaPro - User]] | ||
| + | <br style="clear:both;" /> | ||
| + | Check the '''SIP Station''' box. <br> | ||
| + | The '''Related to Trunk''' must be set to the correct Exigo SIP Trunk (one for each Exigo Controller). <br> | ||
| + | For redundancy you need two numbers. <br> | ||
| + | For example will 98001 call '''Controller A (node 2)''', and '''98002 Controller B (node 3)''': | ||
| + | [[File:Redundant alphacom integration 2.JPG|thumb|left|500px|98001 - Node 3 (Controller 2)]] | ||
| + | <br style="clear:both;" /> | ||
| + | |||
| + | === Step 3. Group Call === | ||
| + | In order to achieve redundancy AlphaCom needs to call both Exigo Controllers at the same time.<br> | ||
| + | This is done by doing a Group Call from AlphaCom.<br> | ||
| + | Go to '''Groups''' -> '''Local Groups'''. | ||
| + | Edit (change) an available group and include the two member (for example 98001 and 98002): | ||
| + | |||
| + | [[File:Redundant alphacom integration 3.JPG|thumb|left|500px|Group Call - Calling both Controllers]] | ||
| + | <br style="clear:both;" /> | ||
| + | This Group Call will then make sure that AlphaCom call both Exigo Controllers simultaneously. | ||
== EMT Configuration == | == EMT Configuration == | ||
| + | There is 3 main configurations that needs to be done in EMT: | ||
| + | * The AlphaCom node needs to be added. | ||
| + | * '''Actions Calls''' and | ||
| + | * '''AlphaCom features''' also needs to be configured. | ||
| + | === Step 1. Add the AlphaCom node === | ||
| + | First step is to add the AlphaCom node to the system.<br> | ||
| + | In Components view expand the '''External Devices'''.<br> | ||
| + | Drag the AlphaCom to the '''System''' -> '''Integration''': | ||
| + | [[File:Alphacom integration 10.JPG|thumb|left|500px|EMT - Add the AlphaCom node]] | ||
| + | <br style="clear:both;" /> | ||
| + | Type in the '''IP address''' of the AlphaCom. | ||
| + | |||
| + | === Step 2. Action Calls === | ||
| + | For the AlphaCom to trigger features in the Exigo system one or more '''Action Calls''' needs to be added.<br> | ||
| + | For redundancy we need identical '''Action Call''' to be started in both controllers.<br> | ||
| + | In Components view expand '''External Connections'''.<br> | ||
| + | Drag '''Action Call''' to '''System''' -> '''Integration''' -> '''Action Calls''': | ||
| + | [[File:Alphacom integration 11.JPG|thumb|left|500px|EMT - Add Action Call]] | ||
| + | <br style="clear:both;" /> | ||
| + | Repeat the process so that you have minimum two '''Action Calls'''. | ||
| + | |||
| + | Then you can add input action to the '''Action Call'''. We will use '''Live Speech''' in this example.<br> | ||
| + | In Components view expand '''Input action'''.<br> | ||
| + | Drag '''Live Speech''' to '''System''' -> '''Integration''' -> '''Action Calls''' -> '''98001''' -> '''On Connect''' | ||
| + | [[File:Alphacom integration 12.JPG|thumb|left|500px|EMT - Add Live Speech]] | ||
| + | <br style="clear:both;" /> | ||
| + | In the pop up select: | ||
| + | * '''Activation''': Start. | ||
| + | * '''Destination''': The zones you want the Live Speech. | ||
| + | * '''Priority''': Default priority is 50. | ||
| + | * '''Chime''': Select the desired chime. | ||
| + | Press '''Done'''.<br> | ||
| + | To make the '''Live Speech''' stop you also need to program '''Live Speech''' on disconnect.<br> | ||
| + | This needs to have '''Activation''': Stop.<br> | ||
| + | Then you do the exact same settings for '''Action Call 98002'''.<br> | ||
| + | This will then make sure that the Group Call we configured in AlphaCom starts '''98001''' in Controller A and '''98002''' in Controller B. | ||
| + | |||
| + | === Step 3. AlphaCom Feature === | ||
| + | Adding an '''AlphaCom Feature''' allows Exigo to trigger activities in the AlphaCom.<br> | ||
| + | For redundancy both controllers needs to send the same command. | ||
| + | In Components view expand '''External Connections'''.<br> | ||
| + | Drag '''Action Call''' to '''System''' -> '''Integration''': | ||
| + | [[File:Redundant alphacom integration 4.JPG|thumb|left|500px|EMT - Add AlphaCom Feature]] | ||
| + | <br style="clear:both;" /> | ||
| + | Each '''AlphaCom Feature''' relates to one feature number, typically a group number such as 85, 86 and so on.<br> | ||
| + | In this example we will use the group number 85 to trigger a group call in AlphaCom.<br> | ||
| + | To make sure both controllers send the same command the '''Assign To System''' must be set to '''Both'''. | ||
| + | |||
| + | Each '''AlphaCom Feature''' can be assigned to different zones in the system.<br> | ||
| + | Best practice is to have a dedicated zone for the AlphaCom.<br> | ||
| + | Add a new zone to the system and give it an descriptive name (for example AlphaCom).<br> | ||
| + | Drag '''AlphaCom Feature''' to the new zone: | ||
| + | [[File:Alphacom integration 14.JPG|thumb|left|500px|EMT - Add AlphaCom Feature to the Zone]] | ||
| + | <br style="clear:both;" /> | ||
| + | |||
| + | The group call from Exigo need to be adjusted on the AlphaCom.<br> | ||
| + | In this example we have used group 85. | ||
| + | [[File:Alphacom integration 15.JPG|thumb|left|500px|AlphaPro - Configure group 85]] | ||
| + | <br style="clear:both;" /> | ||
| + | Exigo does not have an M key, and the group should therefore be set to '''Automatic M-key'''.<br> | ||
| + | Best practice is to let the Exigo system control the gong. The AlphaCom group should therefore have '''No Gong''' set.<br> | ||
| + | Be sure to include the members that you want to be part of the group.<br> | ||
| + | The Exigo - AlphaCom integration should now work. | ||
| + | == Availability == | ||
| + | This feature is available from Exigo 1.3.2.7 and newer. | ||
| − | |||
[[Category:Integration]] | [[Category:Integration]] | ||
[[Category:Exigo features]] | [[Category:Exigo features]] | ||
Latest revision as of 10:54, 28 May 2018
This article explains how to setup and configure redundant AlphaCom integration on an Exigo A-B system.
The solution may also be used for Exigo system with hot-standby controller.
Redundant AlphaCom integration is obtain as follows:
- From AlphaCom to Exigo -> The AlphaCom calls both Exigo Controllers simultaneously.
- From Exigo to AlphaCom -> Calls from Exigo is sent to the AlphaCom from both Exigo controllers.
If one of the Exigo Controllers fails you will still have integration between AlphaCom and the Exigo system.
Configuration Overview
Exigo Management Tool (EMT) is used for setting up the integration in Exigo.
AlphaPro is used for setting up the integration in AlphaCom.
From Exigo there is two types of actions defined:
- Action Calls - from AlphaCom to Exigo.
- AlphaCom features - from Exigo to AlphaCom.
Exigo will use numbers from 98001 to 98099 to start activities in Exigo on incoming activities.
Outgoing from Exigo can define any number.
AlphaPro Configuration
Configuration on the AlphaCom with redundant call to Exigo contains three steps:
- Define and map IP addresses to the two Exigo Nodes (Controller A and Controller B).
- Defining Directory Numbers.
- Make a Group Call that calls both controllers.
Step 1. Define and map IP addresses to the first Exigo Node (Controller A)
The following steps needs to be repeated for Controller B.
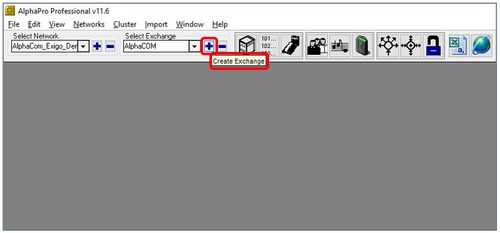
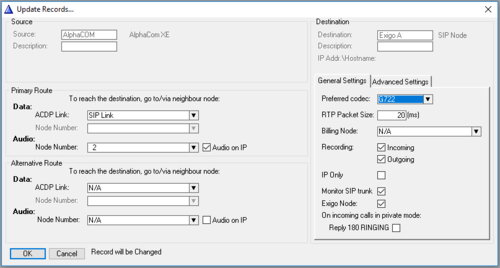
Select Create Exchange to create the first Exigo SIP node in your AlphaCom system:
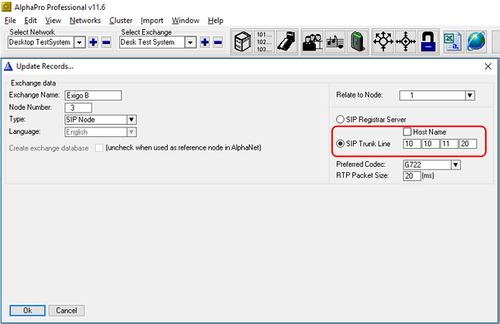
Set the IP adress for the first Exigo PSC (Controller A) as the SIP Trunk Line:
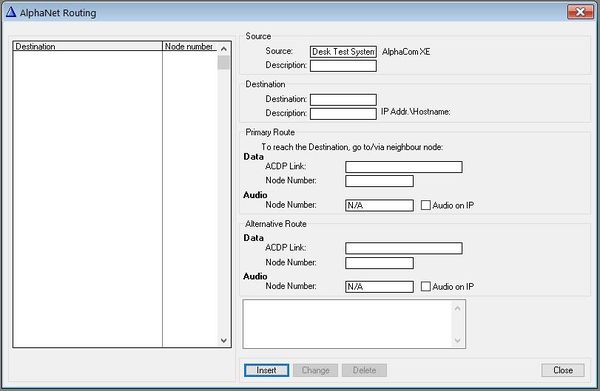
Set up Net Routing:
Go to Exchange & System -> Net Routing:
Select Insert:
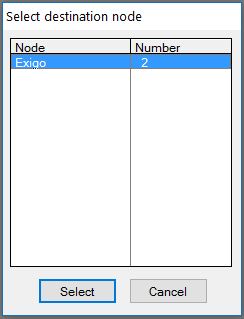
Select the Exigo node:
Select ACDP Link: SIP Link (31)
Press OK.
The steps above must then be repeated for Controller B.
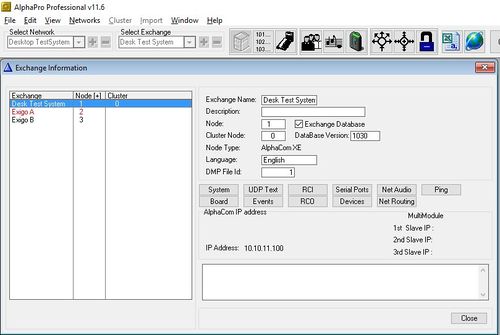
After adding both controllers you should now have two Exigo nodes:
Step 2. Defining Directory Numbers
In order to achieve redundancy the AlphaCom needs to call both controllers at the same time.
The next step is to add the directory numbers which are used in Exigo. These numbers are from 98001 to 98099.
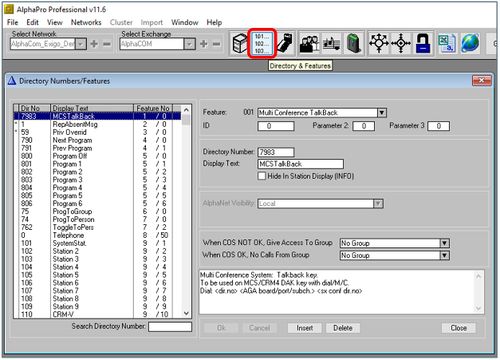
Select Directory and Features:
Here you need to add the number of directory numbers/Action Calls you need.
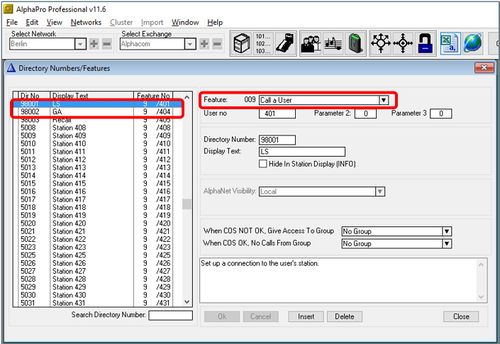
For redundancy you need to add minimum two numbers (for example 98001 and 98002).
98001 will then call Controller A, and 98002 will call Controller B.
Add a directory number 98001 with feature number 9 (Call a User).
This will give you a number that are automatically in All Call 84, and can also be added to groups.
Give the Directory Number a descriptive text in Display Text.
The User will look like this:
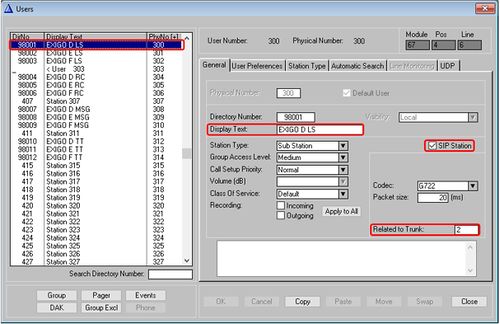
Check the SIP Station box.
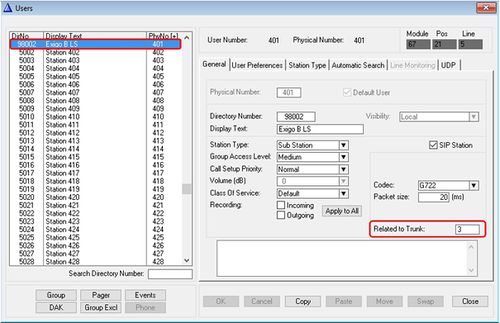
The Related to Trunk must be set to the correct Exigo SIP Trunk (one for each Exigo Controller).
For redundancy you need two numbers.
For example will 98001 call Controller A (node 2), and 98002 Controller B (node 3):
Step 3. Group Call
In order to achieve redundancy AlphaCom needs to call both Exigo Controllers at the same time.
This is done by doing a Group Call from AlphaCom.
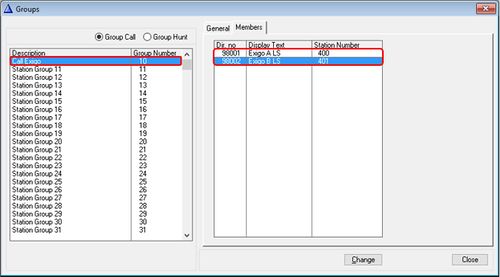
Go to Groups -> Local Groups.
Edit (change) an available group and include the two member (for example 98001 and 98002):
This Group Call will then make sure that AlphaCom call both Exigo Controllers simultaneously.
EMT Configuration
There is 3 main configurations that needs to be done in EMT:
- The AlphaCom node needs to be added.
- Actions Calls and
- AlphaCom features also needs to be configured.
Step 1. Add the AlphaCom node
First step is to add the AlphaCom node to the system.
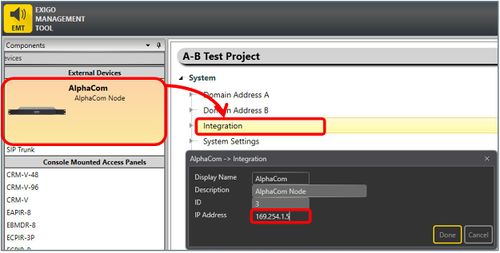
In Components view expand the External Devices.
Drag the AlphaCom to the System -> Integration:
Type in the IP address of the AlphaCom.
Step 2. Action Calls
For the AlphaCom to trigger features in the Exigo system one or more Action Calls needs to be added.
For redundancy we need identical Action Call to be started in both controllers.
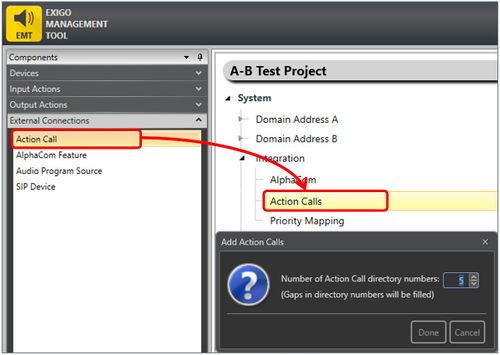
In Components view expand External Connections.
Drag Action Call to System -> Integration -> Action Calls:
Repeat the process so that you have minimum two Action Calls.
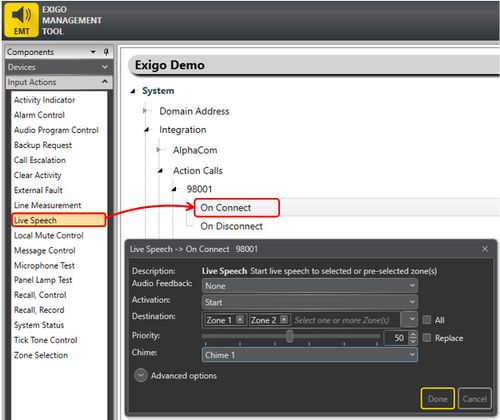
Then you can add input action to the Action Call. We will use Live Speech in this example.
In Components view expand Input action.
Drag Live Speech to System -> Integration -> Action Calls -> 98001 -> On Connect
In the pop up select:
- Activation: Start.
- Destination: The zones you want the Live Speech.
- Priority: Default priority is 50.
- Chime: Select the desired chime.
Press Done.
To make the Live Speech stop you also need to program Live Speech on disconnect.
This needs to have Activation: Stop.
Then you do the exact same settings for Action Call 98002.
This will then make sure that the Group Call we configured in AlphaCom starts 98001 in Controller A and 98002 in Controller B.
Step 3. AlphaCom Feature
Adding an AlphaCom Feature allows Exigo to trigger activities in the AlphaCom.
For redundancy both controllers needs to send the same command.
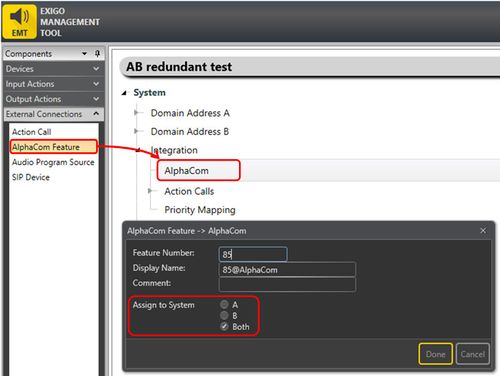
In Components view expand External Connections.
Drag Action Call to System -> Integration:
Each AlphaCom Feature relates to one feature number, typically a group number such as 85, 86 and so on.
In this example we will use the group number 85 to trigger a group call in AlphaCom.
To make sure both controllers send the same command the Assign To System must be set to Both.
Each AlphaCom Feature can be assigned to different zones in the system.
Best practice is to have a dedicated zone for the AlphaCom.
Add a new zone to the system and give it an descriptive name (for example AlphaCom).
Drag AlphaCom Feature to the new zone:
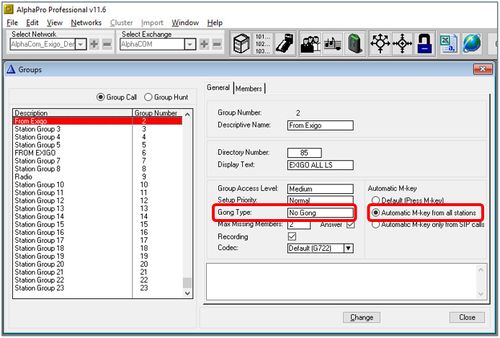
The group call from Exigo need to be adjusted on the AlphaCom.
In this example we have used group 85.
Exigo does not have an M key, and the group should therefore be set to Automatic M-key.
Best practice is to let the Exigo system control the gong. The AlphaCom group should therefore have No Gong set.
Be sure to include the members that you want to be part of the group.
The Exigo - AlphaCom integration should now work.
Availability
This feature is available from Exigo 1.3.2.7 and newer.


