Difference between revisions of "Using IP Speaker as AVC Device"
Jump to navigation
Jump to search
(→Configuration) |
(→Configuration) |
||
| (2 intermediate revisions by the same user not shown) | |||
| Line 13: | Line 13: | ||
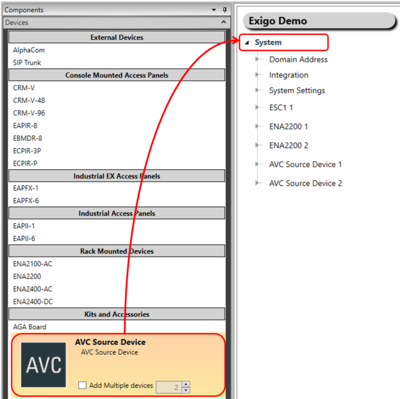
[[File:AVC config 1.PNG|left|thumb|400px|Add AVC Source Device to the system]] | [[File:AVC config 1.PNG|left|thumb|400px|Add AVC Source Device to the system]] | ||
| + | <br style="clear:both;" /> | ||
| + | |||
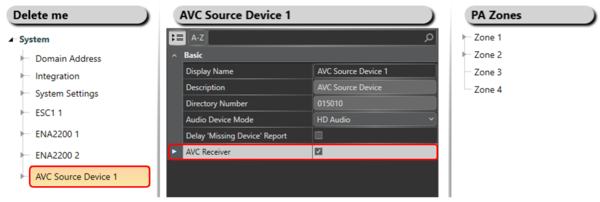
| + | If you want the IP Speaker to also receive the AVC adjustment tick of the AVC Receive check box. | ||
| + | |||
| + | [[File:IP speaker AVC device 1.png|left|thumb|600px|AVC Receiver]] | ||
<br style="clear:both;" /> | <br style="clear:both;" /> | ||
Latest revision as of 14:48, 26 June 2019
This article describes how to use an IP Speaker as both IP Speaker and AVC Device.
This is done by connecting a microphone to the IP Speaker.
Connection
Information on where to connect the microphone can be found here: TKIS-2 Connections
Configuration
The IP Speaker must be added to the system as an AVC Device (not an IP Speaker).
To add an AVC Source Device to the system:
- In Components view, open Devices.
- In Kits and Accessories locate AVC Source Device.
- Drag and drop AVC Source Device to System in the device tree.
If you want the IP Speaker to also receive the AVC adjustment tick of the AVC Receive check box.
To add the AVC Device/IP Speaker to the zone:
- Locate the desired AVC Source Device in the device tree.
- Drag and drop the AVC Source Device to the Zone.
More information
Automatic Volume Control (AVC)
Automatic Volume Control (AVC) Configuration
Availability
This functionality is currently not part of an official package.
Please contact AlphaSupport if you like to know more.


