Difference between revisions of "Automatic Volume Control (AVC) Configuration"
(→Availability) |
(→Availability) |
||
| Line 65: | Line 65: | ||
== Availability == | == Availability == | ||
| − | A technical preview is available in Exigo 1.3.3.1. | + | A technical preview is available in Exigo 1.3.3.1. <br> |
Official release is available from Exigo 1.4 and newer. | Official release is available from Exigo 1.4 and newer. | ||
[[Category:Getting started]] | [[Category:Getting started]] | ||
Revision as of 08:13, 29 May 2018
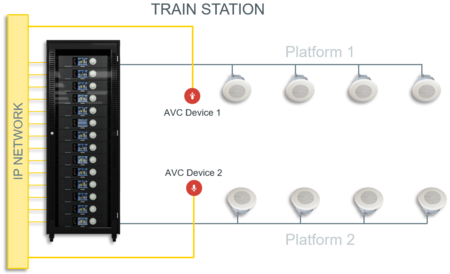
This article will explain the principle on how to setup and configure Automatic Gain Control (AGC) in Exigo.
Contents
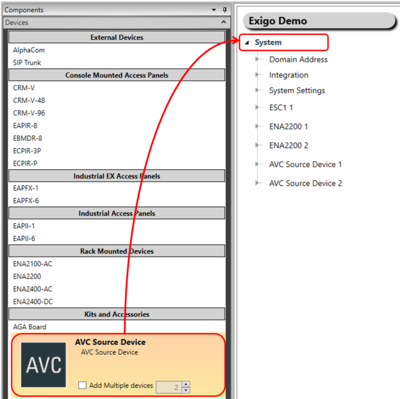
Step 1: Add AVC Device To The System
To add an AVC device to the system:
- In Components view, open Devices.
- In Kits and Accessories locate AVC Device.
- Drag and drop AVC Device to System in the device tree.
Step 2: Add the AVC Device To The Zone
To add the AVC device to the zone:
- Locate the desired AVC Device in the device tree.
- Drag and drop the AVC Device to the Zone.
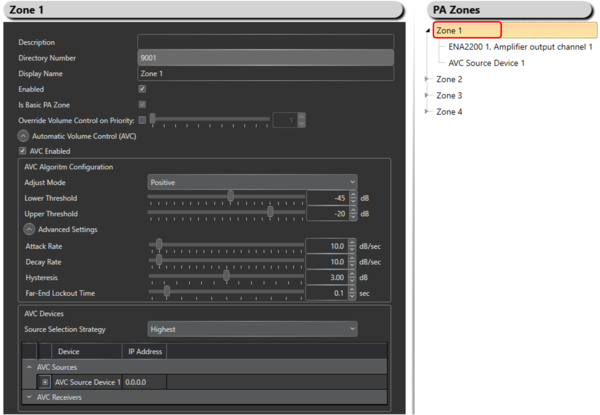
Step 3: Adjust the settings for the AVC Device(s)
To adjust the settings for the AVC device(s) in a zone:
- Go to the designated Zone (top level).
- Do the necessary settings.
Parameter Details
AVC Enabled: Enable/Disable the AVC Control.
Adjust Mode: Positive or Negative mode.
- Positive: Gain adjustment is from zero at AVC threshold and adjusted positive. Audio Player needs to configure a base gain at minimum output level.
- Negative: Gain adjustment is from zero at AVC max level and adjusted with negative gain downwards. Audio Player needs to configure a base gain at maximum output level.
Lower Threshold: Mic signal level where AVC start to work. Below this level no adjustment is done, and Audio Players should work on default base gain.
- Default value at -45 dB is empirically measured using default mic sensitivity 5, and target ambient audio SPL level at 65 dBA.
- Example: Threshold = -40 dB
- When AVC Device measurement < -40 dB: No AVC adjustment
- When AVC Device measurement > -40 dB: AVB adjust gain on Players 1 dB per dB above threshold
Upper Threshold: Mic signal level where AVC stops to work. Abowe this level no adjustment is done. The difference between upper and lower threshold also defines the working range for AVC gain adjustments.
In negative AVC mode this also defines the ambient level where configured base output gain is reached (offset adjustment is zero).
Advanced Settings
Attack Rate (dB/sec): This determines how quickly the AVC adjusts gain on raising ambient audio level.
Decay Rate (dB/sec): This determines how quickly the AVC adjusts gain on falling ambient audio level.
Hysteresis (dB): Hysteresis around previous set ambient audio level before doing adjustments.
Far-End Lockout Time (sec): When playing audio in AVC Zone (far-end-signal) all AVC adjustments is locked. When far-end-signal ends, adjustments commences after this lockout-time. Lower values allows more adjustments in pauses of signal played.
IP reliant configuration
AVC is reliant on the IP of each device to be able to work. This requires that the IP of each device is configured in EMT. This is done by:
- A) GET from controller:
- When performing a GET from the controller, the IP of all endpoints is written to the database and automatically entered in the AVC configuration
- B) Manually enter IP:
- Also possible to manually enter the IP of each device in the AVC configuration
Availability
A technical preview is available in Exigo 1.3.3.1.
Official release is available from Exigo 1.4 and newer.


