Difference between revisions of "Automatic Volume Control (AVC) Configuration"
Jump to navigation
Jump to search
| Line 27: | Line 27: | ||
[[File:AVC config 3.PNG|left|thumb|600px|AVC settings]] | [[File:AVC config 3.PNG|left|thumb|600px|AVC settings]] | ||
<br style="clear:both;" /> | <br style="clear:both;" /> | ||
| + | |||
| + | == Parameter Details == | ||
| + | |||
| + | '''Description:''' Possible to fill in custom text. | ||
| + | |||
| + | '''Directory Number:''' Directory number of the zone. | ||
| + | |||
| + | '''Display Name:''' Name of the zone. | ||
| + | |||
| + | '''Enabled:''' Disable/Enable | ||
== Availability == | == Availability == | ||
Revision as of 12:27, 9 April 2018
This article will explain the principle on how to setup and configure Automatic Gain Control (AGC) in Exigo.
Contents
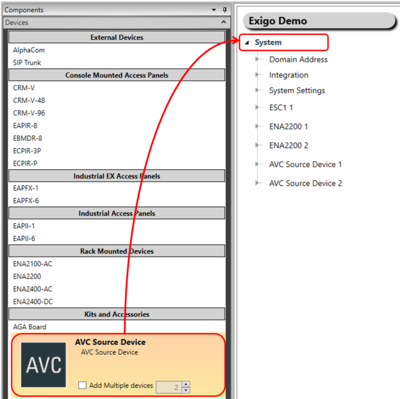
Step 1: Add AVC Device To The System
To add an AVC device to the system:
- In Components view, open Devices.
- In Kits and Accessories locate AVC Device.
- Drag and drop AVC Device to System in the device tree.
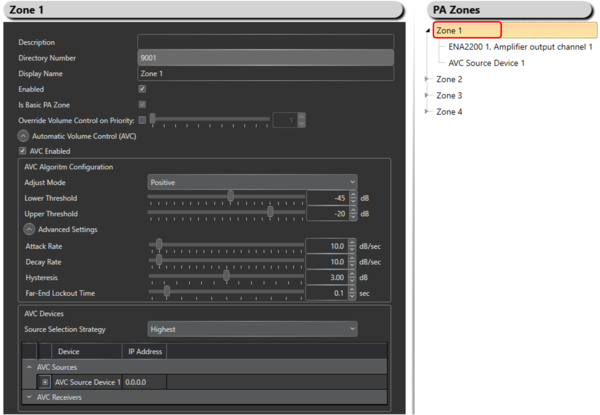
Step 2: Add the AVC Device To The Zone
To add the AVC device to the zone:
- Locate the desired AVC Device in the device tree.
- Drag and drop the AVC Device to the Zone.
Step 3: Adjust the settings for the AVC Device(s)
To adjust the settings for the AVC device(s) in a zone:
- Go to the designated Zone (top level).
- Tick off the Enable box to enable AVC.
- Do the necessary settings.
Parameter Details
Description: Possible to fill in custom text.
Directory Number: Directory number of the zone.
Display Name: Name of the zone.
Enabled: Disable/Enable
Availability
This function is available from Exigo 1.3.3.1 and newer.


