Difference between revisions of "Alarm Generator"
(→Alarm Generator Example) |
|||
| (19 intermediate revisions by 2 users not shown) | |||
| Line 2: | Line 2: | ||
This article explains how the Alarm Generator in Exigo can be used. | This article explains how the Alarm Generator in Exigo can be used. | ||
| − | In Exigo there are already some Alarm Tones | + | In Exigo, there are already some predefined Alarm Tones . But it is also possible to make custom Alarm Tones or customize the predefined alarms. |
| − | The Alarm Generator is located on the PSC (Primary System Controller). | + | The Alarm Generator is located on the PSC (Primary System Controller) and the alarm tones are generated by the system controller. |
| Line 10: | Line 10: | ||
The Alarm Generator is configured using the EMT. | The Alarm Generator is configured using the EMT. | ||
| − | + | In the device tree: | |
| − | + | * Select '''System''' > '''Alarms''' | |
| − | * Select the | + | * Select the Alarm you want to edit |
| − | [[File:Alarm generator | + | [[File:Alarm generator 2.JPG|thumb|left|450px|Alarm Generator in EMT]] |
<br style="clear:both;" /> | <br style="clear:both;" /> | ||
| + | * When you have finished editing, click '''Done''' | ||
| + | === Add or Delete Alarms === | ||
| + | It is also possible to create new Alarms that can be configured from scratch. | ||
| + | * In the upper right corner click the '''Add''' icon to create a new alarm. | ||
| + | [[File:Alarm generator 3.JPG|thumb|left|450px|Add or Delete Alarms]] | ||
| + | <br style="clear:both;" /> | ||
| + | * To delete an alarm, click the '''Recycle Bin''' next to the '''Add''' icon | ||
| + | |||
| + | == Alarm Generator Script == | ||
| + | |||
| + | The Alarm Generator is based on simple script programming. | ||
| + | |||
| + | The programming language is based on '''Lua'''. For more information see [https://en.wikipedia.org/wiki/Lua_(programming_language) '''this'''] article. | ||
| + | === Alarm Generator Example === | ||
| + | '''Script Example:''' | ||
| + | |||
| + | local freq = 1000 | ||
| + | for i = 1,7 do | ||
| + | call_state ('alarm_tone', 'on') | ||
| + | sine( 1, freq ) | ||
| + | call_state ('alarm_tone', 'off') | ||
| + | silence(1) | ||
| + | End | ||
| + | call_state ('alarm_tone', 'on') | ||
| + | sine( 4, freq ) | ||
| + | call_state ('alarm_tone', 'off') | ||
| + | silence(1) | ||
| + | |||
| + | === Script Explanation: === | ||
| + | * '''local freq''' is a variable | ||
| + | * '''for <> end''' is a for loop which runs for i times | ||
| + | * '''silence(x seconds)''' is silence for x seconds long | ||
| + | * '''call_state''' is used for control outputs to see when alarm is off with follow alarm | ||
| + | * '''sine(x seconds, freq)''' is a sine tone lasting x seconds long with frequency | ||
| + | |||
| + | === This alarm is thus: === | ||
| + | |||
| + | Seven repetitions of series with: | ||
| + | ::Alarm tone of 1 kHz for one second | ||
| + | ::Alarm off for 1 second | ||
| + | Then alarm tone of 1kHz for 4 seconds | ||
| + | |||
| + | Then silence for 1 second before restarting sequence | ||
| + | |||
| + | This script example is for General Alarm. | ||
| + | |||
| + | == Parameter Details == | ||
| + | |||
| + | [[File:Alarm generator 4.JPG|left|thumb|600px|Alarm Generator Parameter Details]] | ||
| + | <br style="clear:both;" /> | ||
| + | |||
| + | '''Name:''' This is the name for the Alarm. This can be edited by the user. | ||
| + | |||
| + | '''Feature:''' This is the feature number for the Alarm. This is automatically created by the system. | ||
| + | |||
| + | '''Amplitude:''' The Amplitude is the volume for the Alarm. | ||
| + | |||
| + | '''Repeats:''' Number of repeats or loop for the Alarm sequence. | ||
| + | '''Sequence:''' Field for entering the actual alarm script. | ||
| + | '''Verify:''' Click the Verify button to check that the script created is valid before it is saved. | ||
[[Category:Exigo features]] | [[Category:Exigo features]] | ||
Latest revision as of 14:04, 15 December 2017
This article explains how the Alarm Generator in Exigo can be used.
In Exigo, there are already some predefined Alarm Tones . But it is also possible to make custom Alarm Tones or customize the predefined alarms.
The Alarm Generator is located on the PSC (Primary System Controller) and the alarm tones are generated by the system controller.
Contents
Configuration
The Alarm Generator is configured using the EMT.
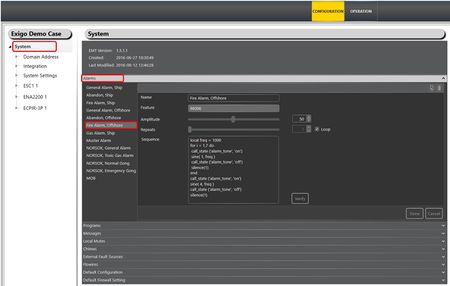
In the device tree:
- Select System > Alarms
- Select the Alarm you want to edit
- When you have finished editing, click Done
Add or Delete Alarms
It is also possible to create new Alarms that can be configured from scratch.
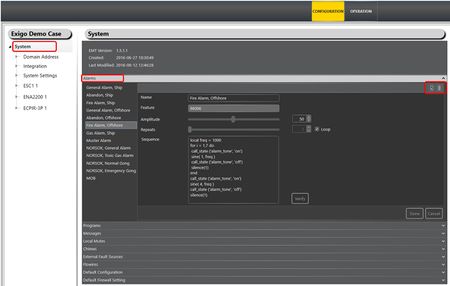
- In the upper right corner click the Add icon to create a new alarm.
- To delete an alarm, click the Recycle Bin next to the Add icon
Alarm Generator Script
The Alarm Generator is based on simple script programming.
The programming language is based on Lua. For more information see this article.
Alarm Generator Example
Script Example:
local freq = 1000
    for i = 1,7 do
    call_state ('alarm_tone', 'on')
    sine( 1, freq )
    call_state ('alarm_tone', 'off')
    silence(1)
End
call_state ('alarm_tone', 'on')
sine( 4, freq )
call_state ('alarm_tone', 'off')
silence(1)
Script Explanation:
- local freq is a variable
- for <> end is a for loop which runs for i times
- silence(x seconds) is silence for x seconds long
- call_state is used for control outputs to see when alarm is off with follow alarm
- sine(x seconds, freq) is a sine tone lasting x seconds long with frequency
This alarm is thus:
Seven repetitions of series with:
- Alarm tone of 1 kHz for one second
- Alarm off for 1 second
Then alarm tone of 1kHz for 4 seconds
Then silence for 1 second before restarting sequence
This script example is for General Alarm.
Parameter Details
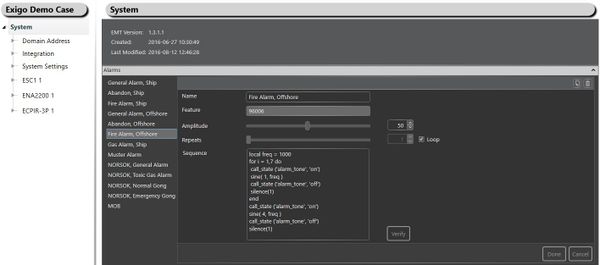
Name: This is the name for the Alarm. This can be edited by the user.
Feature: This is the feature number for the Alarm. This is automatically created by the system.
Amplitude: The Amplitude is the volume for the Alarm.
Repeats: Number of repeats or loop for the Alarm sequence.
Sequence: Field for entering the actual alarm script.
Verify: Click the Verify button to check that the script created is valid before it is saved.


