EBMDR-8

Exigo Button Expansion Module
- Button expansion module for Exigo console mounted access panels
- Powered from master access panel
- Eight programmable buttons with individual labels and status indicators
- Optional button protection covers
- Four units can be connected to one access panel
The EBMDR-8 button expansion module is developed for console mounting. The button module features eight fully programmable buttons, which can be used to manually initiate alarms, select zones or any other action in the Vingtor-
Stentofon Exigo system. The button modules buttons features two independent status indicators each, which can be used to show the status of the related button’s function. The button module is digital and connects to the access panel through a standard I2C interface. Up to four button expansion modules can be daisy chained to one access panel.
Contents
Installation
Overview - Front

| 1 | Label insertion slot | Opening for the insertion of label for the button |
| 2 | Label window | The label window is equipped with backlight functionality |
| 3 | Screw hole | 4 holes used to mount the panel |
| 4 | Function button | In total 8 buttons with removable flip covers |
| 5 | Button protection | |
| 6 | Function indicators |
Overview - Back

| 1 | Expansion input | Connection cable from mastermodule/EBMDR-8 |
| 2 | Expansion output | Connection to next EBMDR-8 |
Placement
The EBMDR-8 expansion module can be flush-mounted in a console or put into a back-box. The back-box can be placed on a surface or mounted on a wall.
 The back-box is not part of the panel and must be ordered separately.
Console Mounting
When mounted in a console, a cut-out must be made for the expansion module, or group of modules. Please refer to the module’s dimensional drawings for making cut-outs.
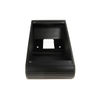
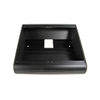
Back-box Mounting
Two different back-box options are available for the EBMDR-8: EMBR-1 and EMBR-2.
Connection
The EBMDR-8 expansion module is a slave unit for the ECPIR and EAPIR panels; hence it must always be mounted in conjunction with one of these master panels. The EBMDR-8 hence receives power from and communicates through its master panel.
Up to four EBMDR-8 panels may be daisy-chained to one master panel.

| 1 | EBMDR-8 Slave Panel |
| 2 | Black Connector |
| 3 | ECPIR/EAPIR Master panel |
| 4 | Connection Cable |
| 5 | White Connector |
- Using the small connection cable supplied, connect the EBMDR-8 expansion module to its master panel or preceding module as shown in the image above.
- To connect more than one EBMDR-8 to the same master, daisy-chain them together.
- Connect the white connector on the cable to the corresponding white connector on the master panel or preceding EBMDR-8.
- Connect the black connector on the cable to the corresponding black connector on the EBMDR-8.
Dimensions

Accessories
|
|
|---|---|
| EMBR-1 | EMBR-2 |
Additional Documentation
For more documentation, please visit the Zenitel web page: https://www.zenitel.com/product/ebmdr-8